Flows List
In the flows page, you will find a list of existing flows for your business. The following information displays in table format:- Flow Name A unique flow name, with letters and numbers only.
- Flow Description A brief description that describes the objective of the flow.
- Traffic from Intent Intents can be routed to specific flows through intent routing. In this column, you will see which intents route to the respective flow. You can click the intent to navigate to the specific intent routing detail page to view routing behavior details.
- Traffic from Redirect Flows have the ability to link to one another through the use of redirect nodes. In this column, you will be able to see which existing flows redirect to the respective flow. You can click the flow to navigate to the specific flow builder page to view flow details.
Flow Builder
The flow builder consists of three major parts:- Flow Graph
- Node Configuration Panel
- Toolbar
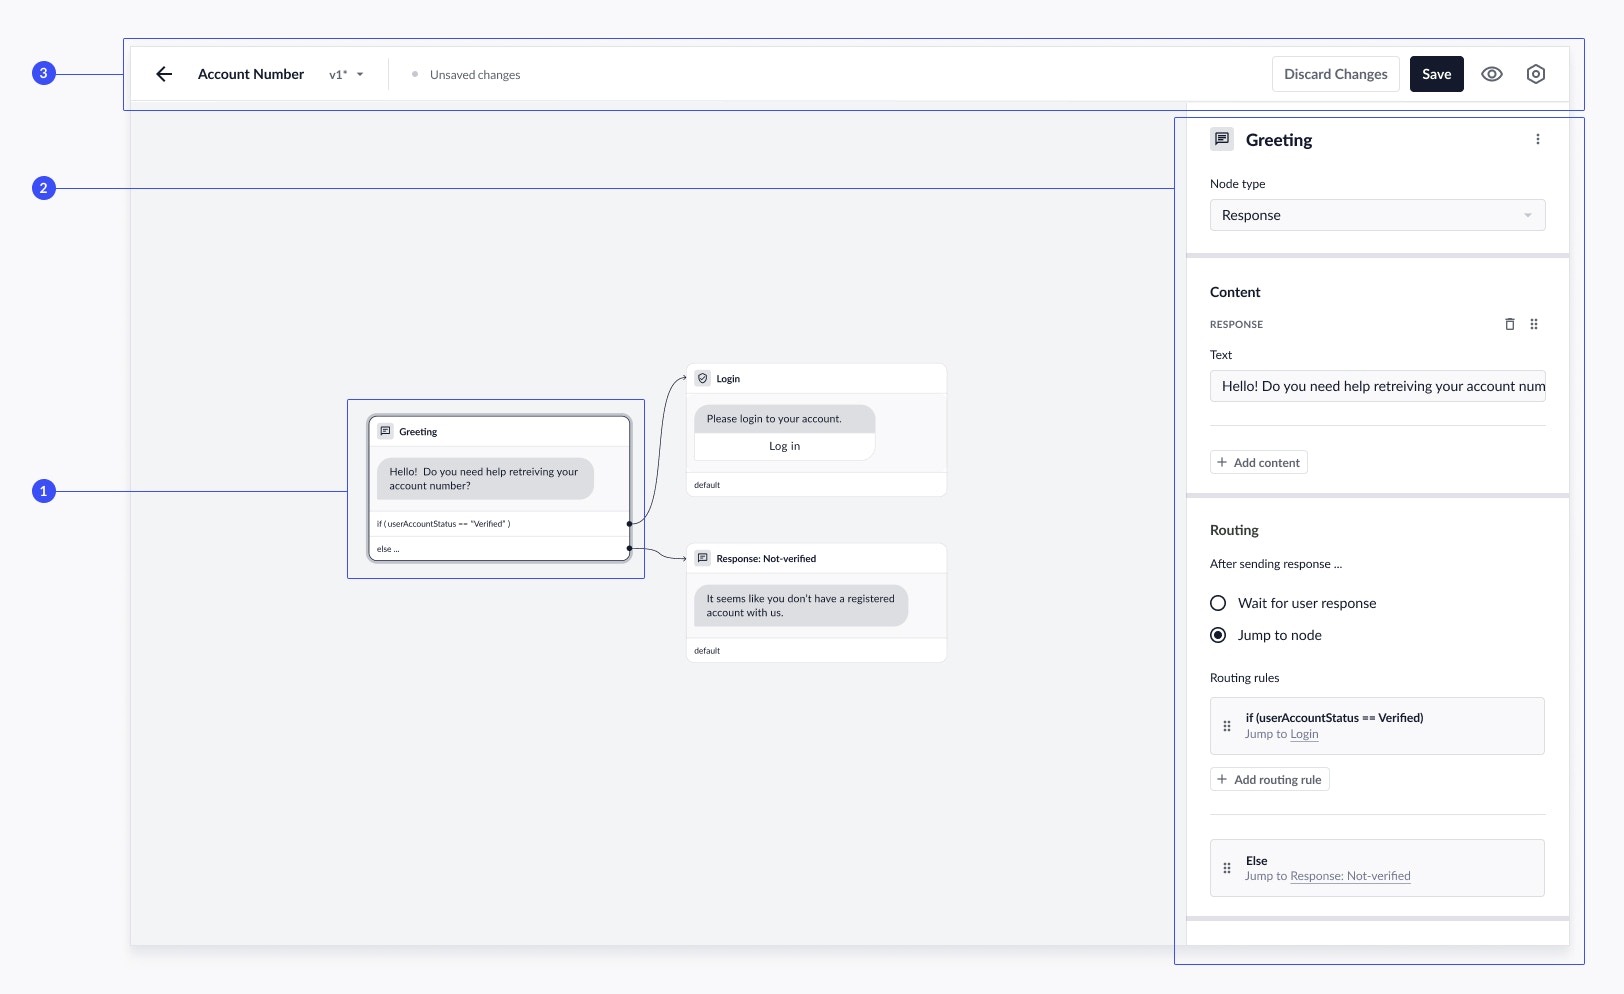
Flow Graph
The Flow Graph is a visual representation of the conversation flow you’re designing, and displays all possible paths of dialog as you create them.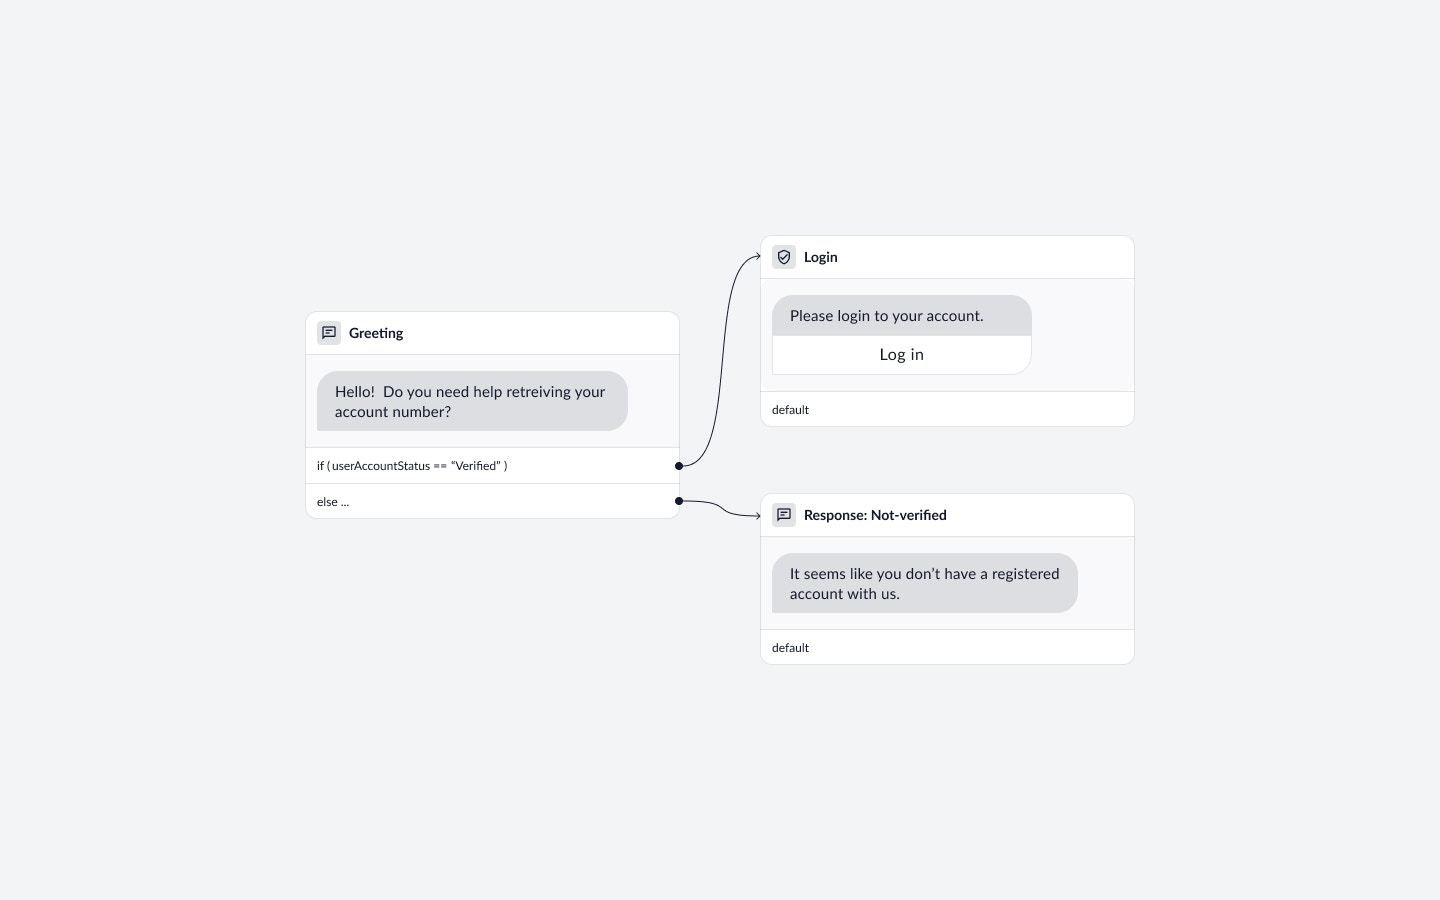
Select Nodes
Each node in the graph can be selected by clicking anywhere on the node. Upon selection, the node configuration panel will automatically expand on the right.Flow Graph Zoom
You can zoom in on particular parts of the flow by using the zoom percentage bar at the bottom right or using your computer trackpad or mouse.Node Configuration Panel
The node configuration panel allows you to manage settings and configure routing rules for the following node types:- Response Node: configure virtual agent responses, send deeplinks, and classify what customers say in return.
- Login Node: direct the customer to authenticate before proceeding in the flow.
- Redirect Node: redirect customer to another flow.
- Agent Node: direct the customer to an agent queue.
- End Node: wrap up the conversation by confirming whether the customer needs additional help.
- API Node: use API fields dynamically in your flows.
Toolbar
The toolbar displays the flow name and allows to you perform a number of different functions:- Version Dropdown: view and toggle through multiple versions of the flow.
- Version Indicators: keep track of flow version deployment to Test or Production environments
- Manage Versions: manage flow version deployment to Test or Production environments
- Preview: click to preview your current flow version in real-time
- More Actions:
- Copy link to test: Navigate to your demo environment to test a flow.
- Flow Settings: View flow information such as name, description, and flow shortcut.

Node Types
Response Node
- Content
- Routing
- Advanced Settings
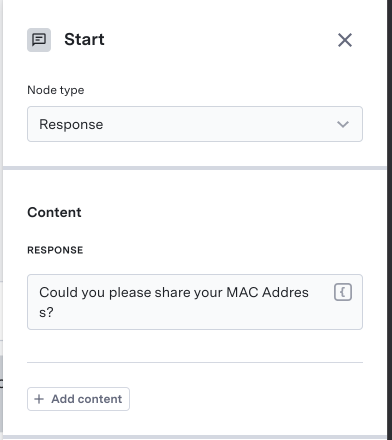
Content
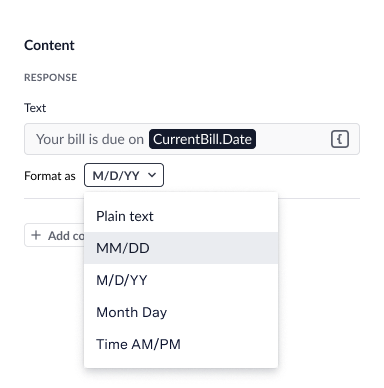
The Content section allows you to specify the responses and deeplinks that will be sent to the customer. You can add as many of either as you like by clicking Add Content and selecting from the menu. Once added, this content can be easily reordered by dragging, or deleted by hovering over the content block and clicking the trash icon. In the flow graph, you will be able to preview how the content will be displayed to the customer.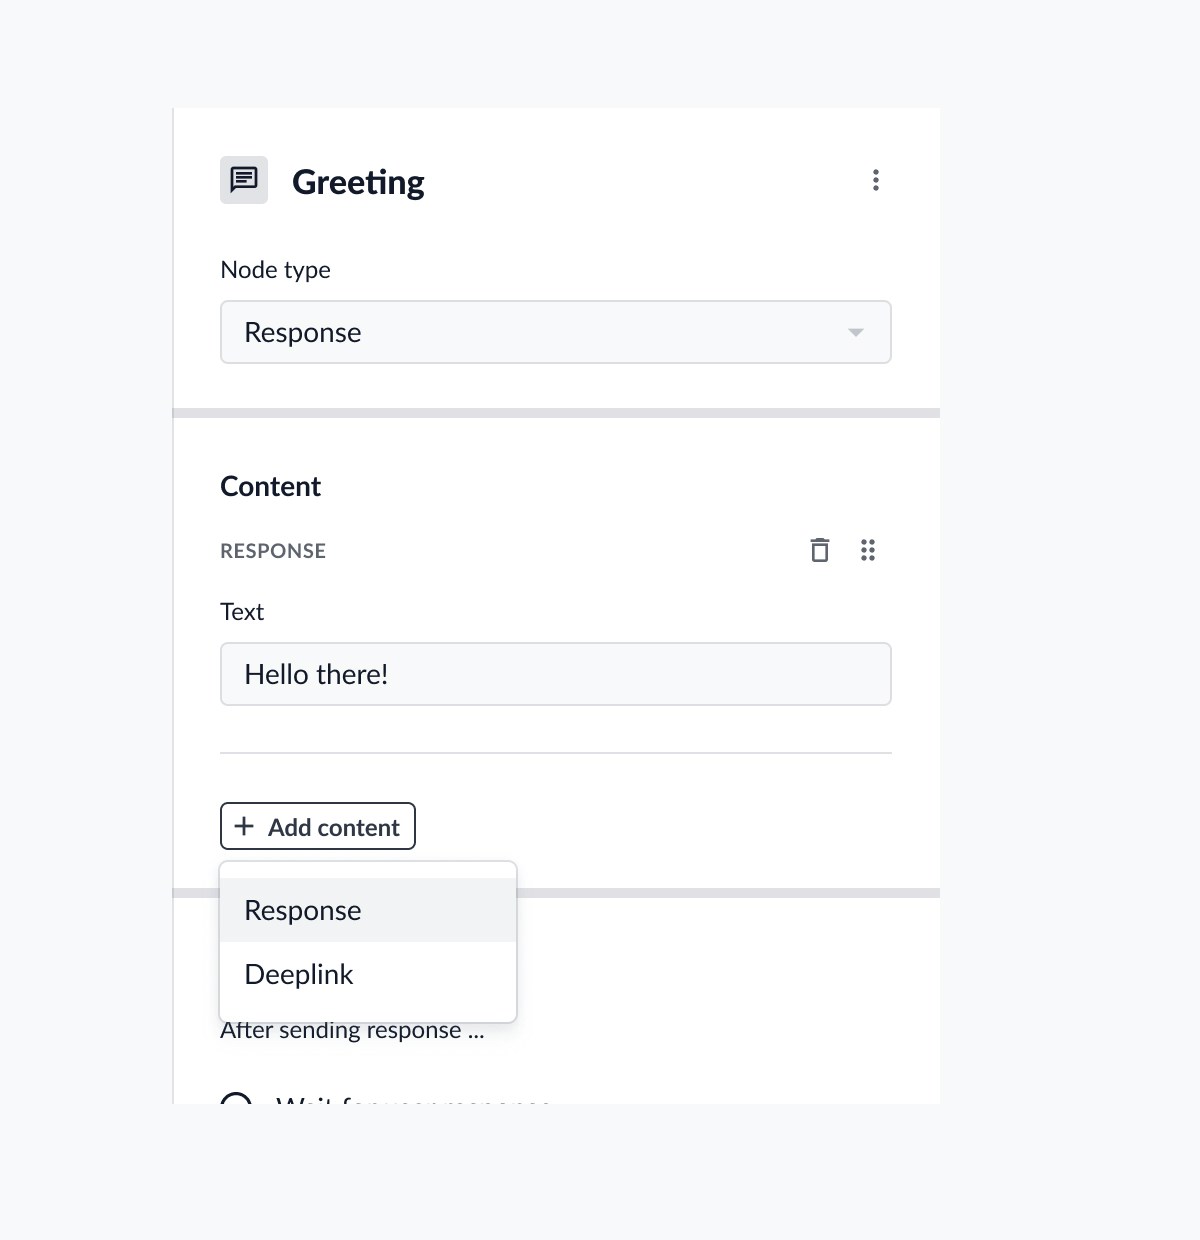
Responses
Any response text you specify will be sent to the customer when they reach the node.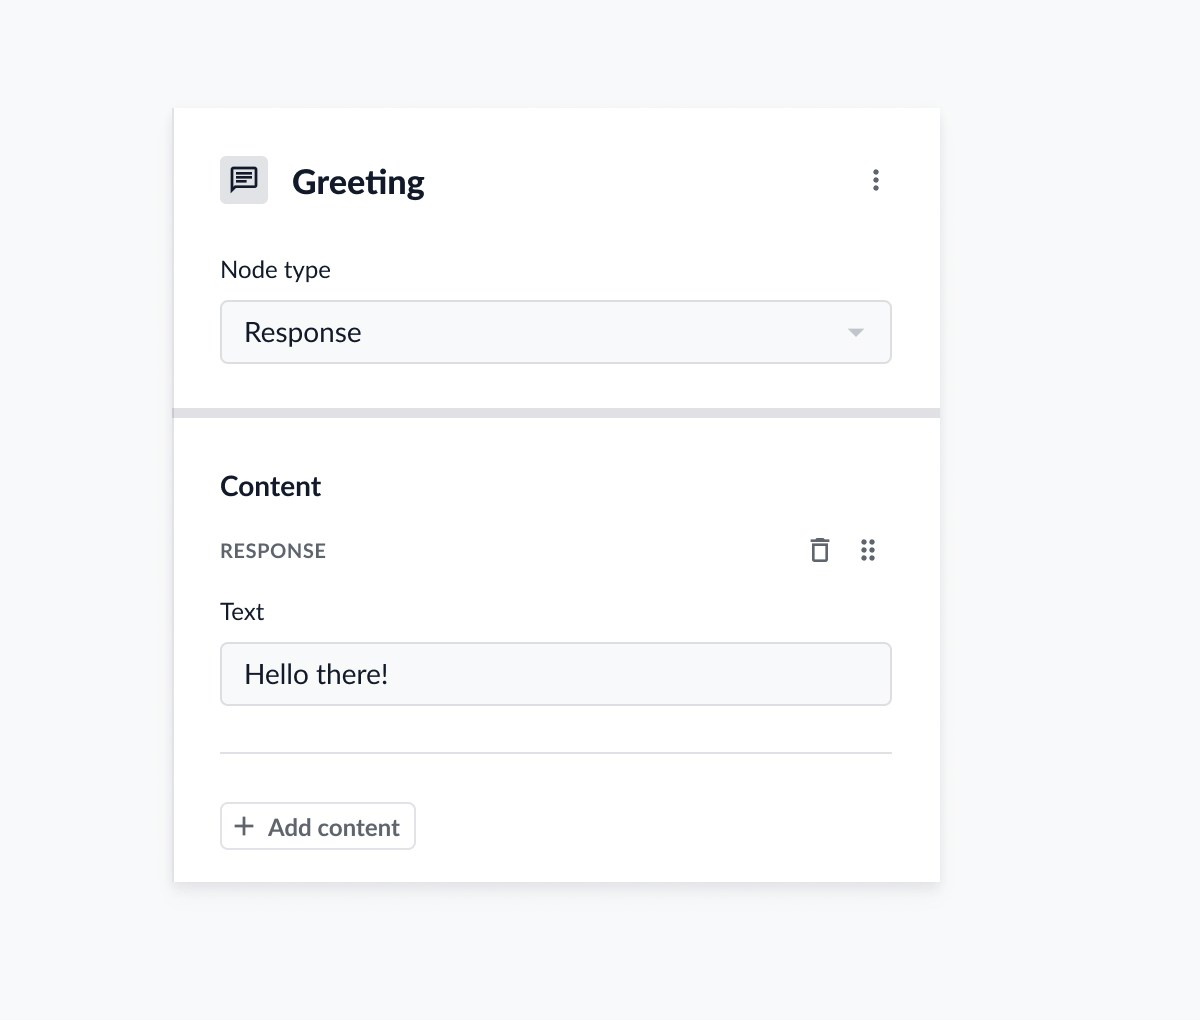
Deeplinks
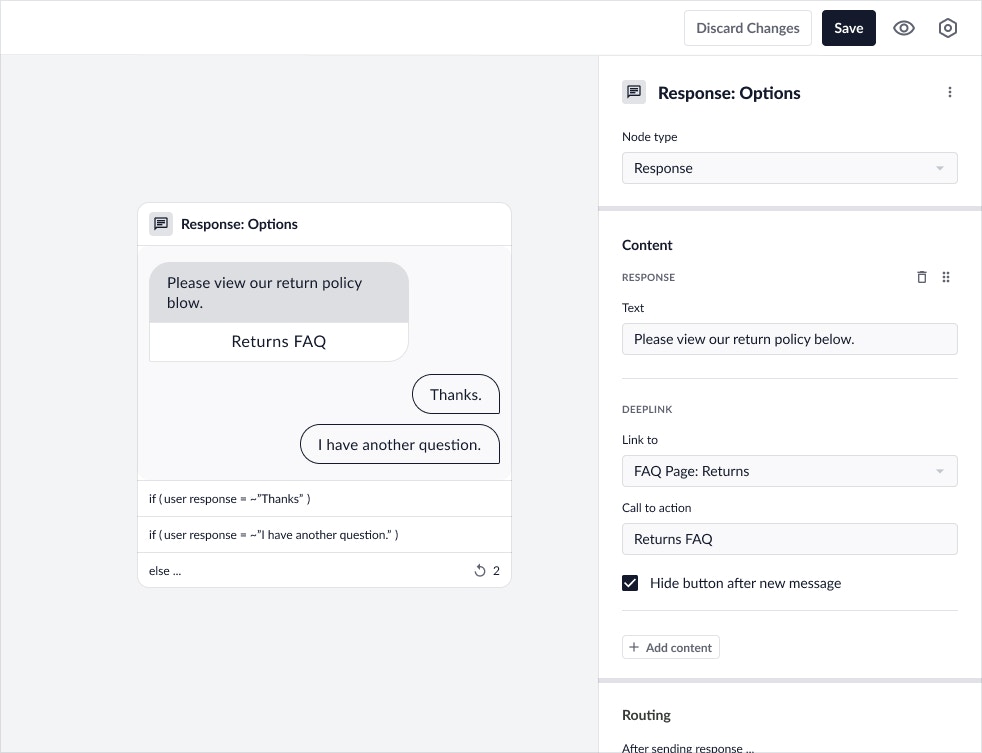
- Link to: select an existing link from the dropdown or directly create a new link. If you select an existing link, you can click View link definition to open the specific link details in a new tab.
- Call to action: define the accompanying text that the customer will click on in order to navigate to the link.
- Hide button after new message: choose to remove the deeplink after a new response appears to prevent users from navigating to the link past this node.
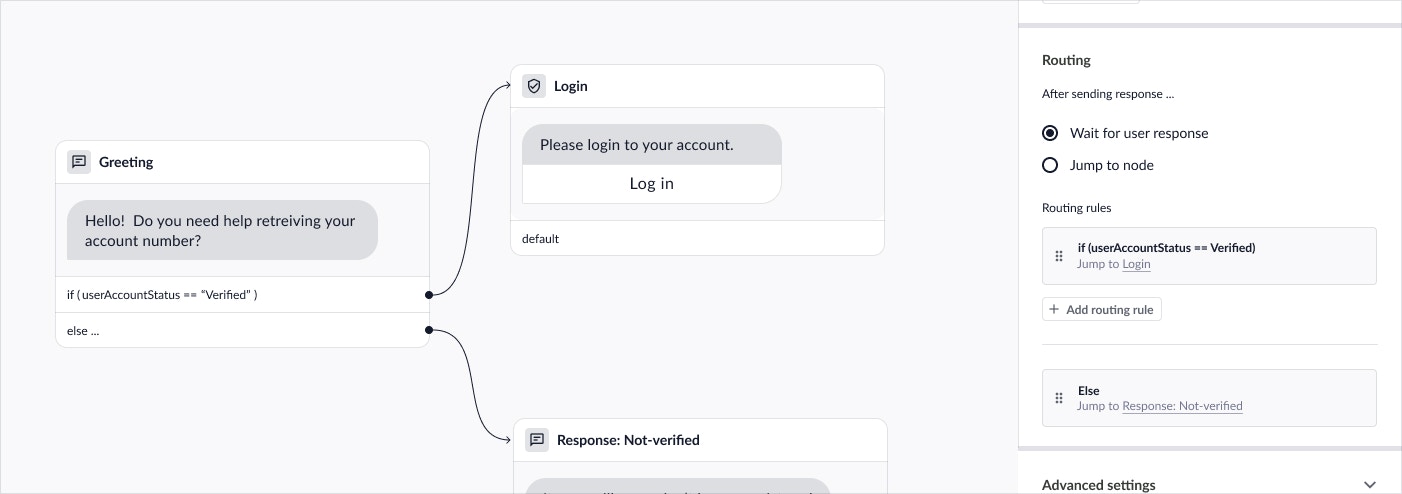
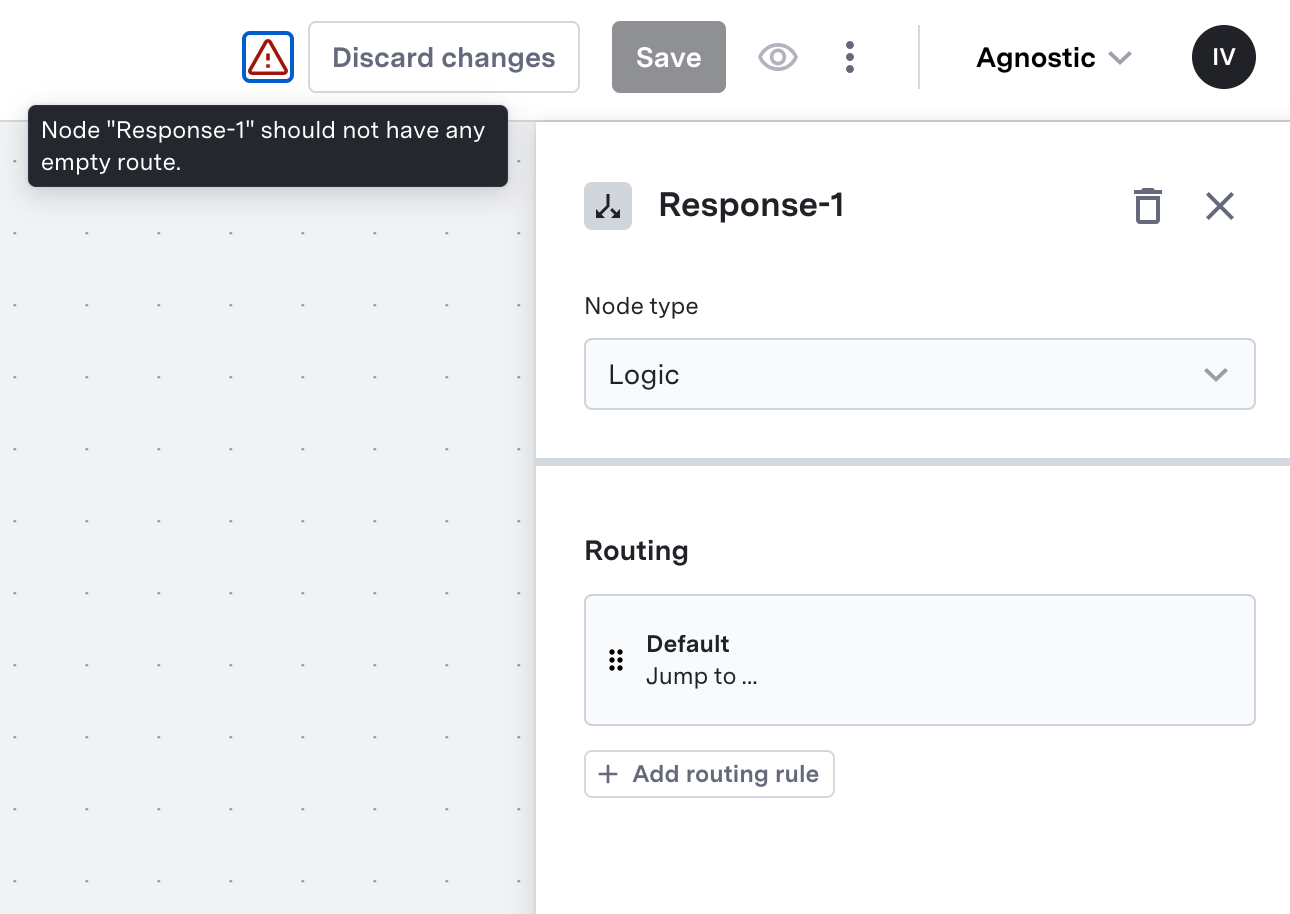
Routing
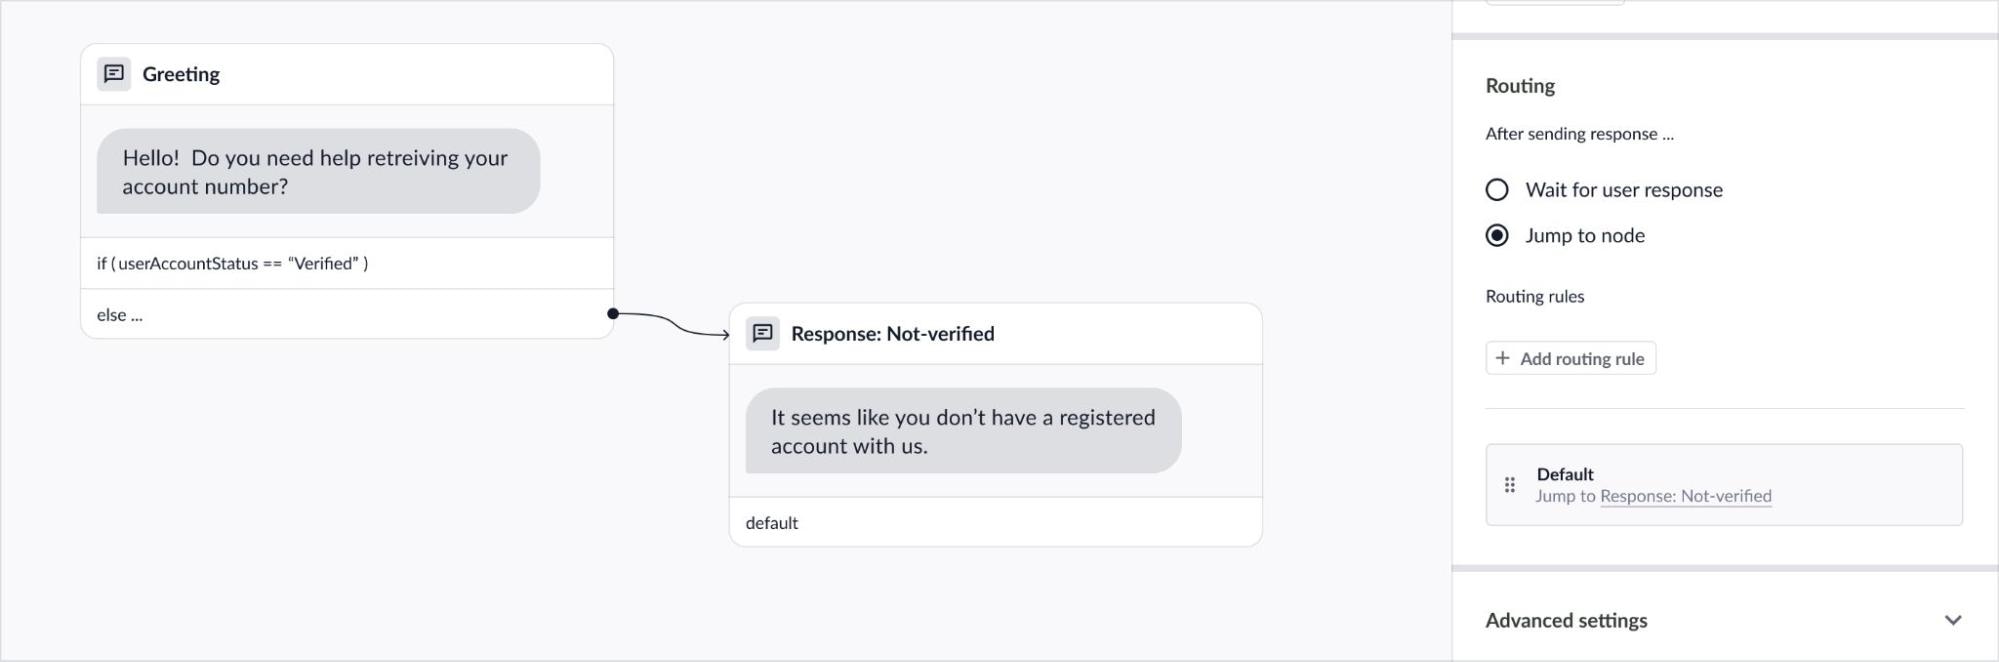
The Routing section is where you will configure what happens after the content is sent. You have two options:- Jump to node Choosing to Jump to node allows you to define a default routing rule that will execute immediately after the node content has been delivered to the user.
-
Wait for response
Choosing to Wait for response means that the virtual agent will pause until the customer responds, then attempt to classify their response and branch accordingly. When this option is selected, you’ll need to specify the branches and quick reply text for each type of response you wish the virtual agent to classify. See Branch Classifiers section for more detailed information.
Branch Classifiers
When Wait for response is selected for routing, you can define the branches for each type of response you wish the virtual agent to classify. There are two types of branch classifiers that you can use:-
System classifiers
ASAPP supports pre-trained system templates to classify free text user input. You can use branches like
CONFIRMorDENYthat are already trained by our system and are readily available for use for polar (yes/no) questions. You do not need to supply training utterances for system classifiers.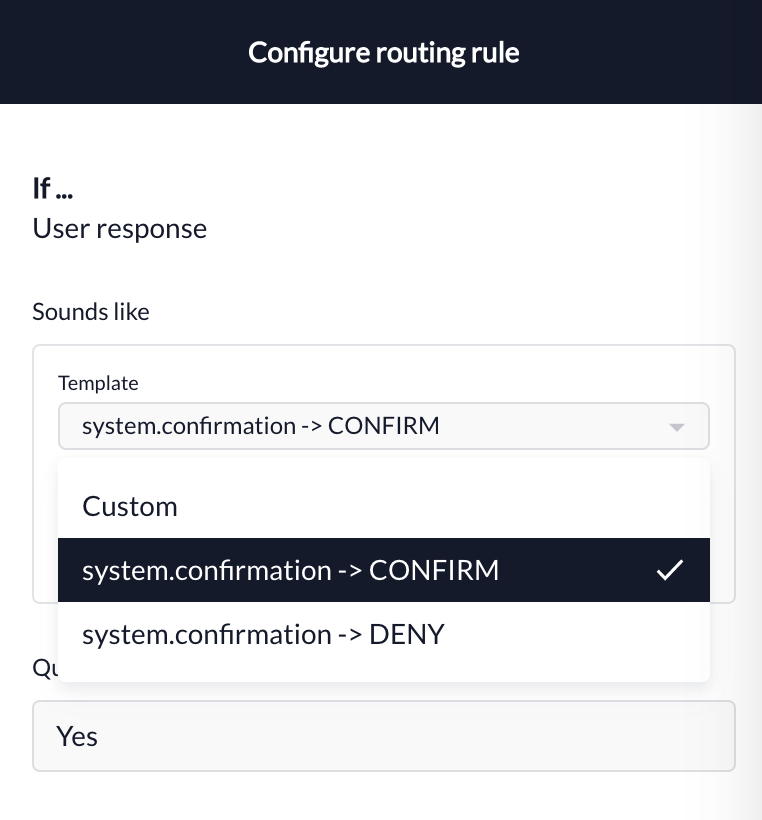
- Custom classifiers If pre-trained classifiers do not meet your needs, define your own custom branches and supply training utterances. You must give your branch classifier a Display Name and supply at least five training utterances to train this custom classification. Learn more about how to best train your custom branches in the Training response route section.
Quick Replies
For each branch classifier, you should define the corresponding Quick Reply text. These will appear in our SDKs (web, mobile) and third-party channels as tapable options.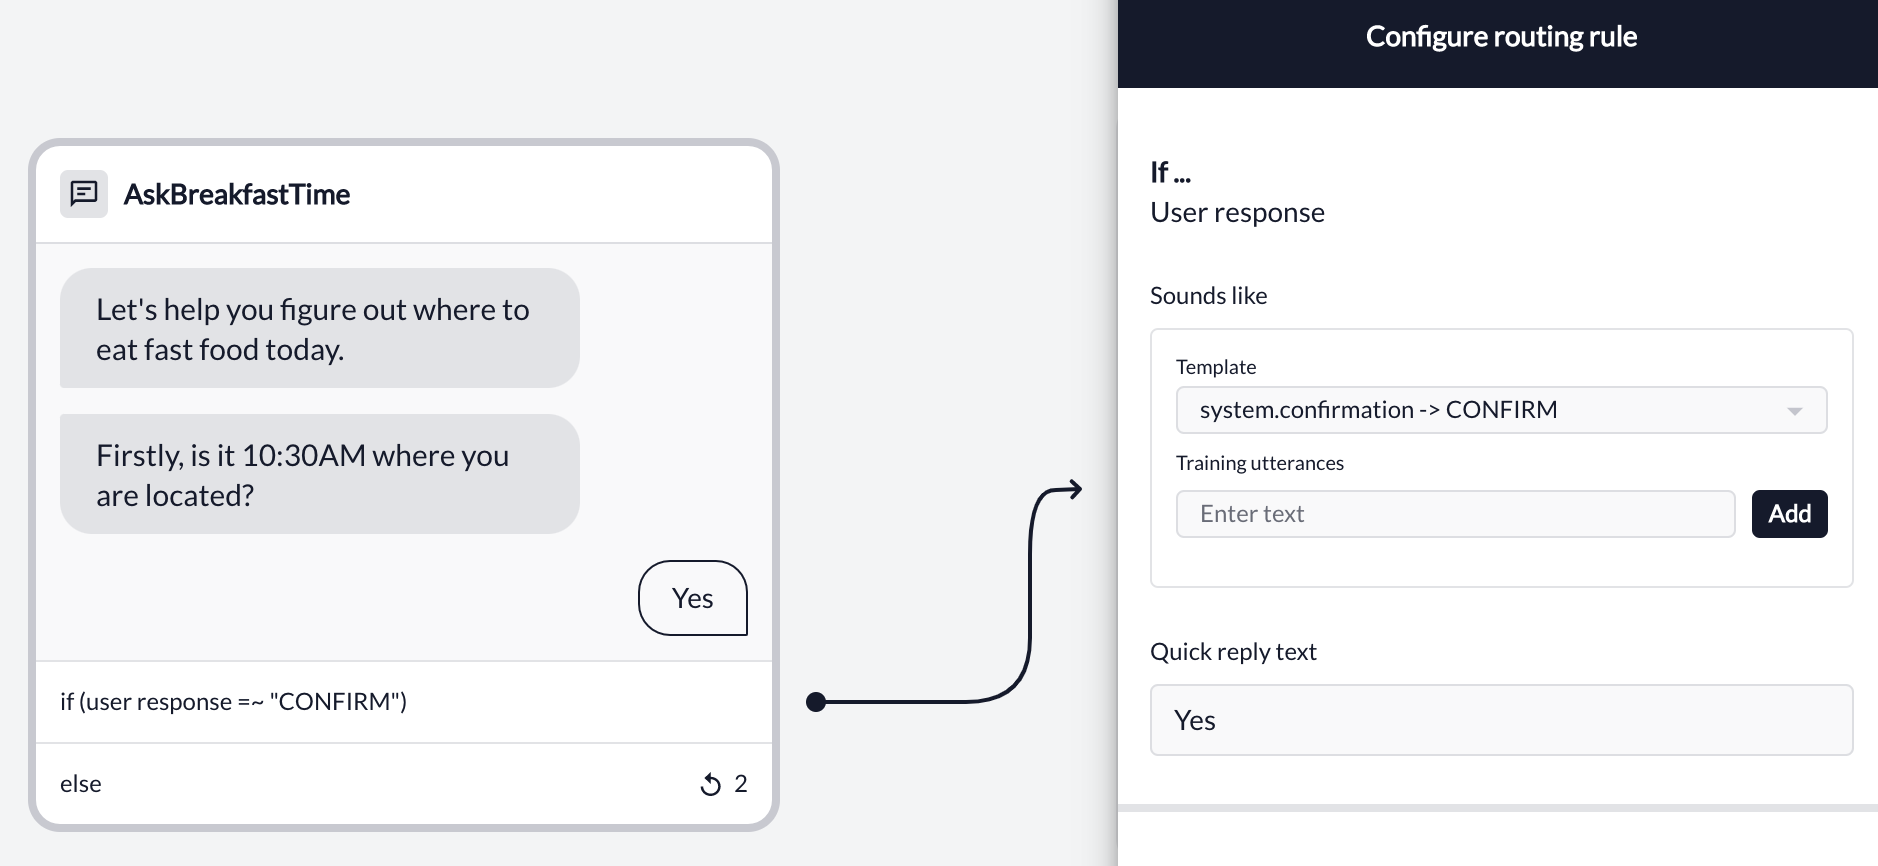
Advanced Settings
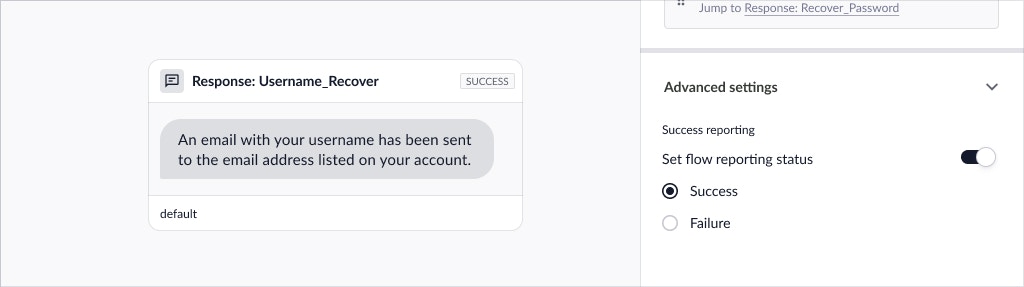
In the Advanced Settings section, you can set flow success reporting for the response node.Flow Success
Flow success attempts to accurately measure whether a customer has successfully self-served through the virtual agent. You measure this by setting the appropriate flow reporting status on certain nodes within a flow. Learn more: How do I determine flow success? To set flow reporting status for response nodes:- Toggle Set flow reporting status on.
- By default, Success is selected for response nodes but this can be modified for your particular flow.
Login Node
The Login Node enables customer authentication within a flow. In this node, you can define the following:- Content
- Routing
- Advanced Settings
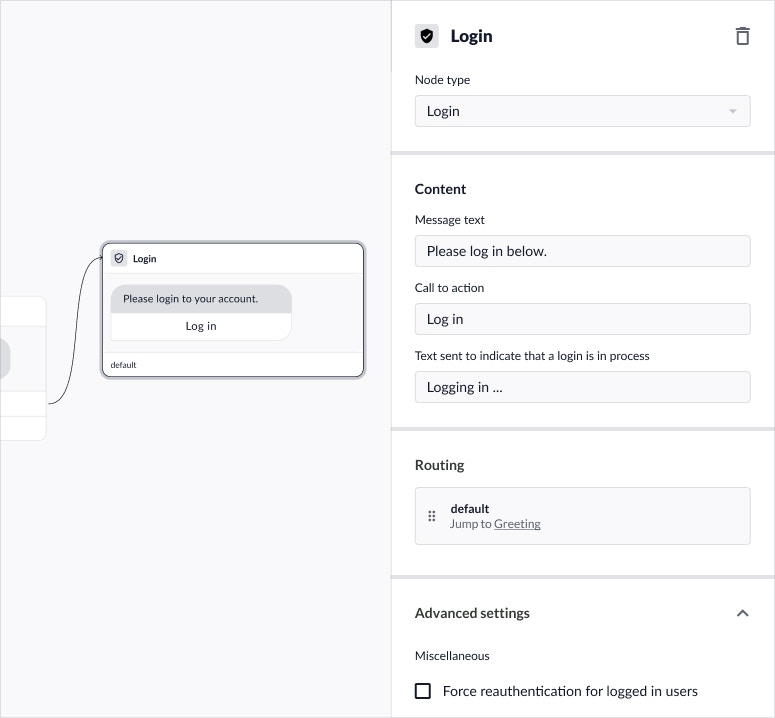
Content
The Content section allows you to define the text to be shown to the customer to accompany the login action. All login nodes will have default text which you can modify to suit your particular flow needs.- Message text: Define the main text that will prompt the customer to login
- Call to action: Define the accompanying text that the customer will click on in order to login
- Text sent to indicate that a login is in process: customize the text that is sent after the customer has tried to log in.
Routing
Flows cannot end on a login node. The Routing section is where you can configure what happens after a customer successfully logs in or optionally configure branches for exceptional conditions.On login
In the On login section, you must define the default routing rule that will execute after the customer successfully logs in.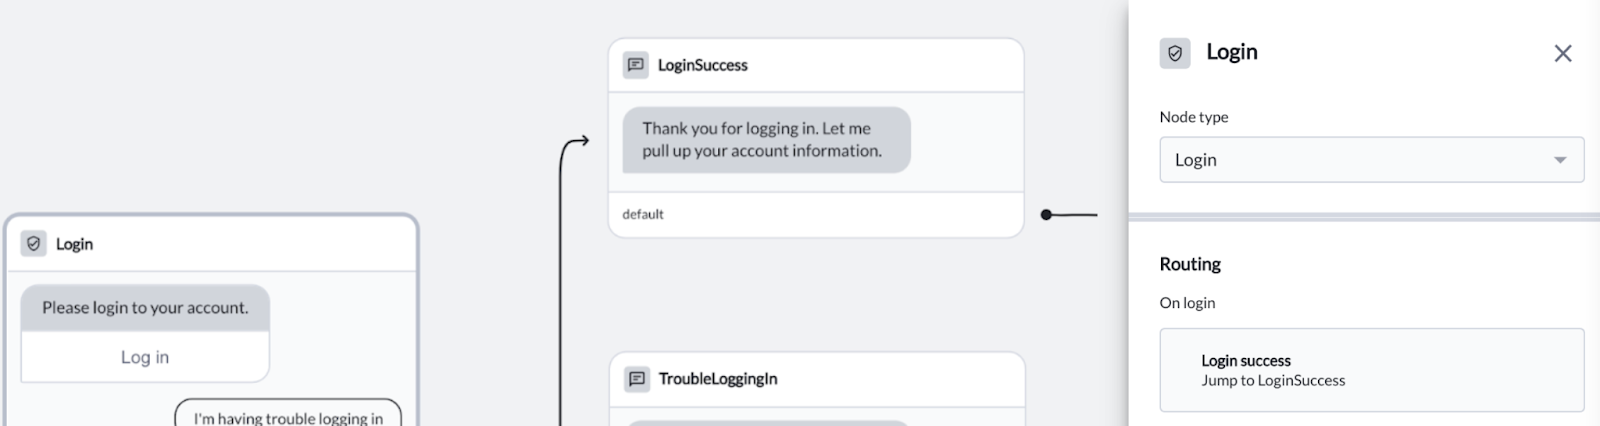
On response
Similar to response nodes, you can optionally add response branches in the On response section to account for exceptional conditions that may occur when a customer is trying to authenticate, such as login errors or retries and refreshes. Please see Branch Classifiers on the response node for more information on how to configure these routing rules.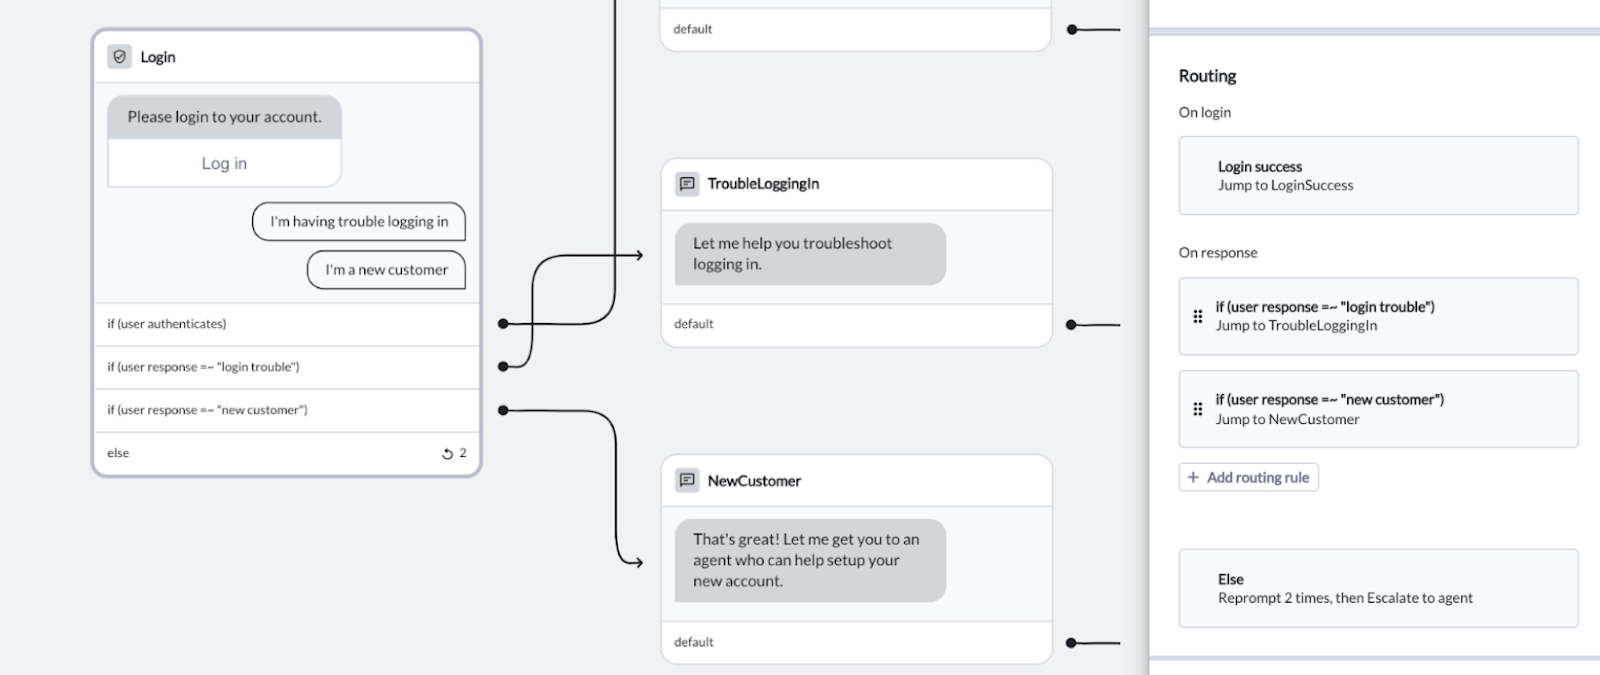
Else
In the Else section, you can define what happens if login is unsuccessful and we do not recognize customer responses.Advanced Settings
In Advanced Settings, you have the option to Force reauthentication which will prompt all customers to log in again, regardless of current authentication state.API Node
The API node allows you to use API fields dynamically in your flows. The data you retrieve on an API node can be used for two things:- Displaying the data on subsequent nodes.
- Routing to different nodes based on the data.
Data Request
The Data Request section allows you to add data fields from an existing API integration.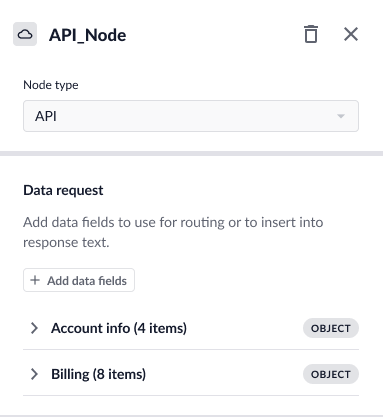
You can only select one action per node; selecting an action will automatically disable the selection of additional objects, actions, and arrays.
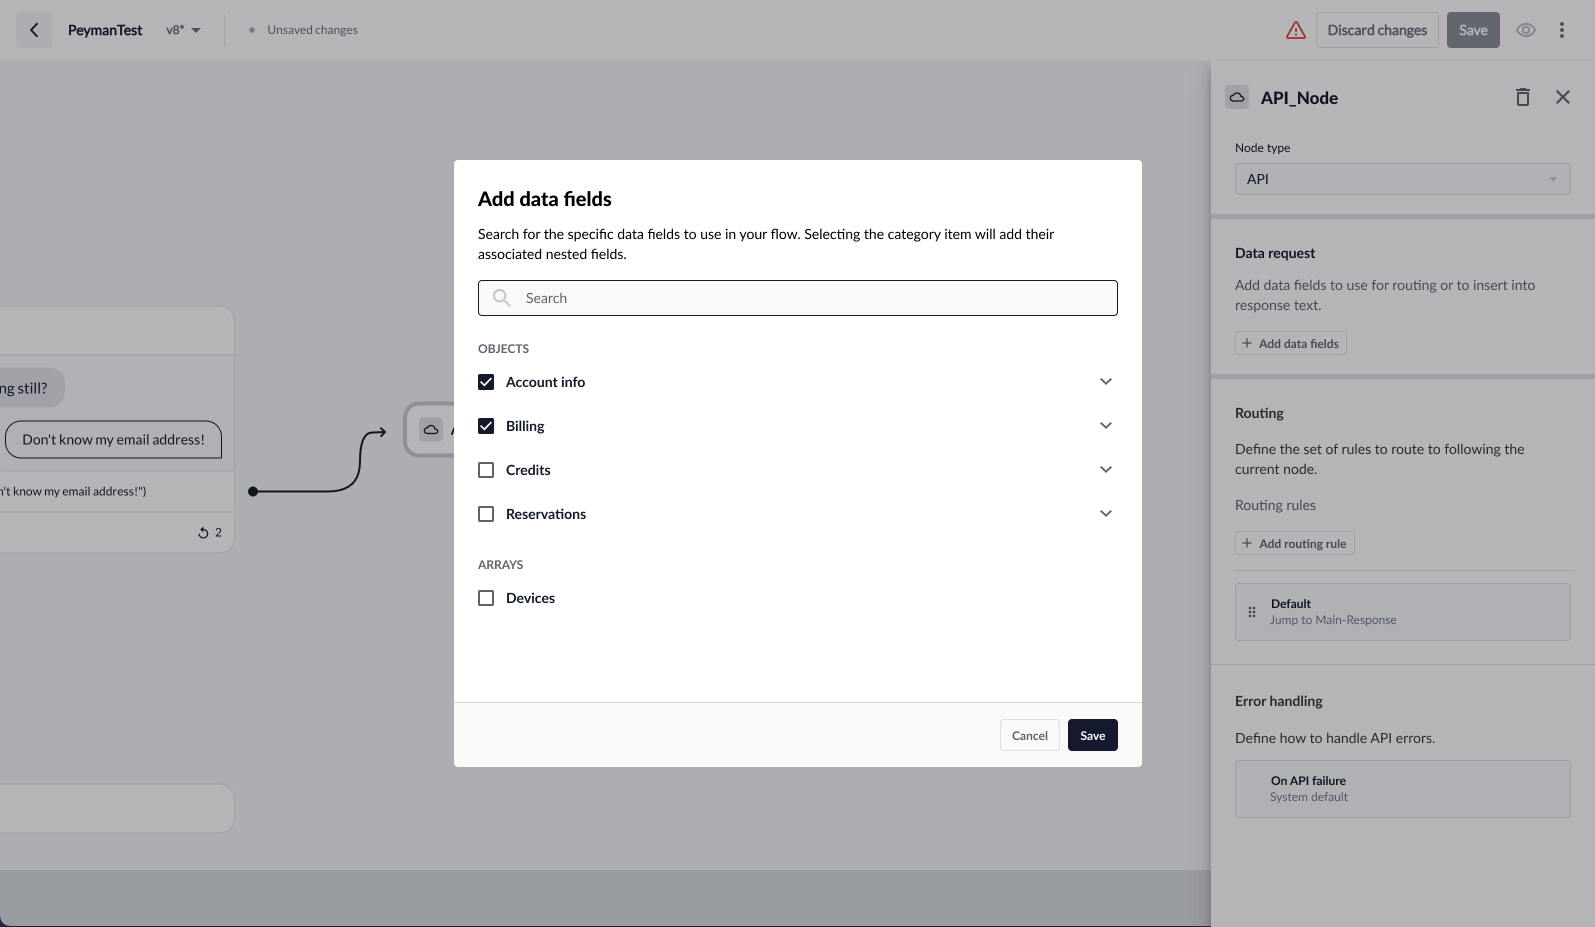
Input Parameters
Some actions require input parameters for the API call, which you can define in AI-Console. In the node edit panel, you can see a field for defining parameters that will be passed as part of the API call. This field leverages curly brackets: click the curly bracket icon or select the shift>{ or } keys to choose the API value to pass as an input parameter.Only valid data can be used for input parameters; objects or arrays will not be surfaced through curly brackets.
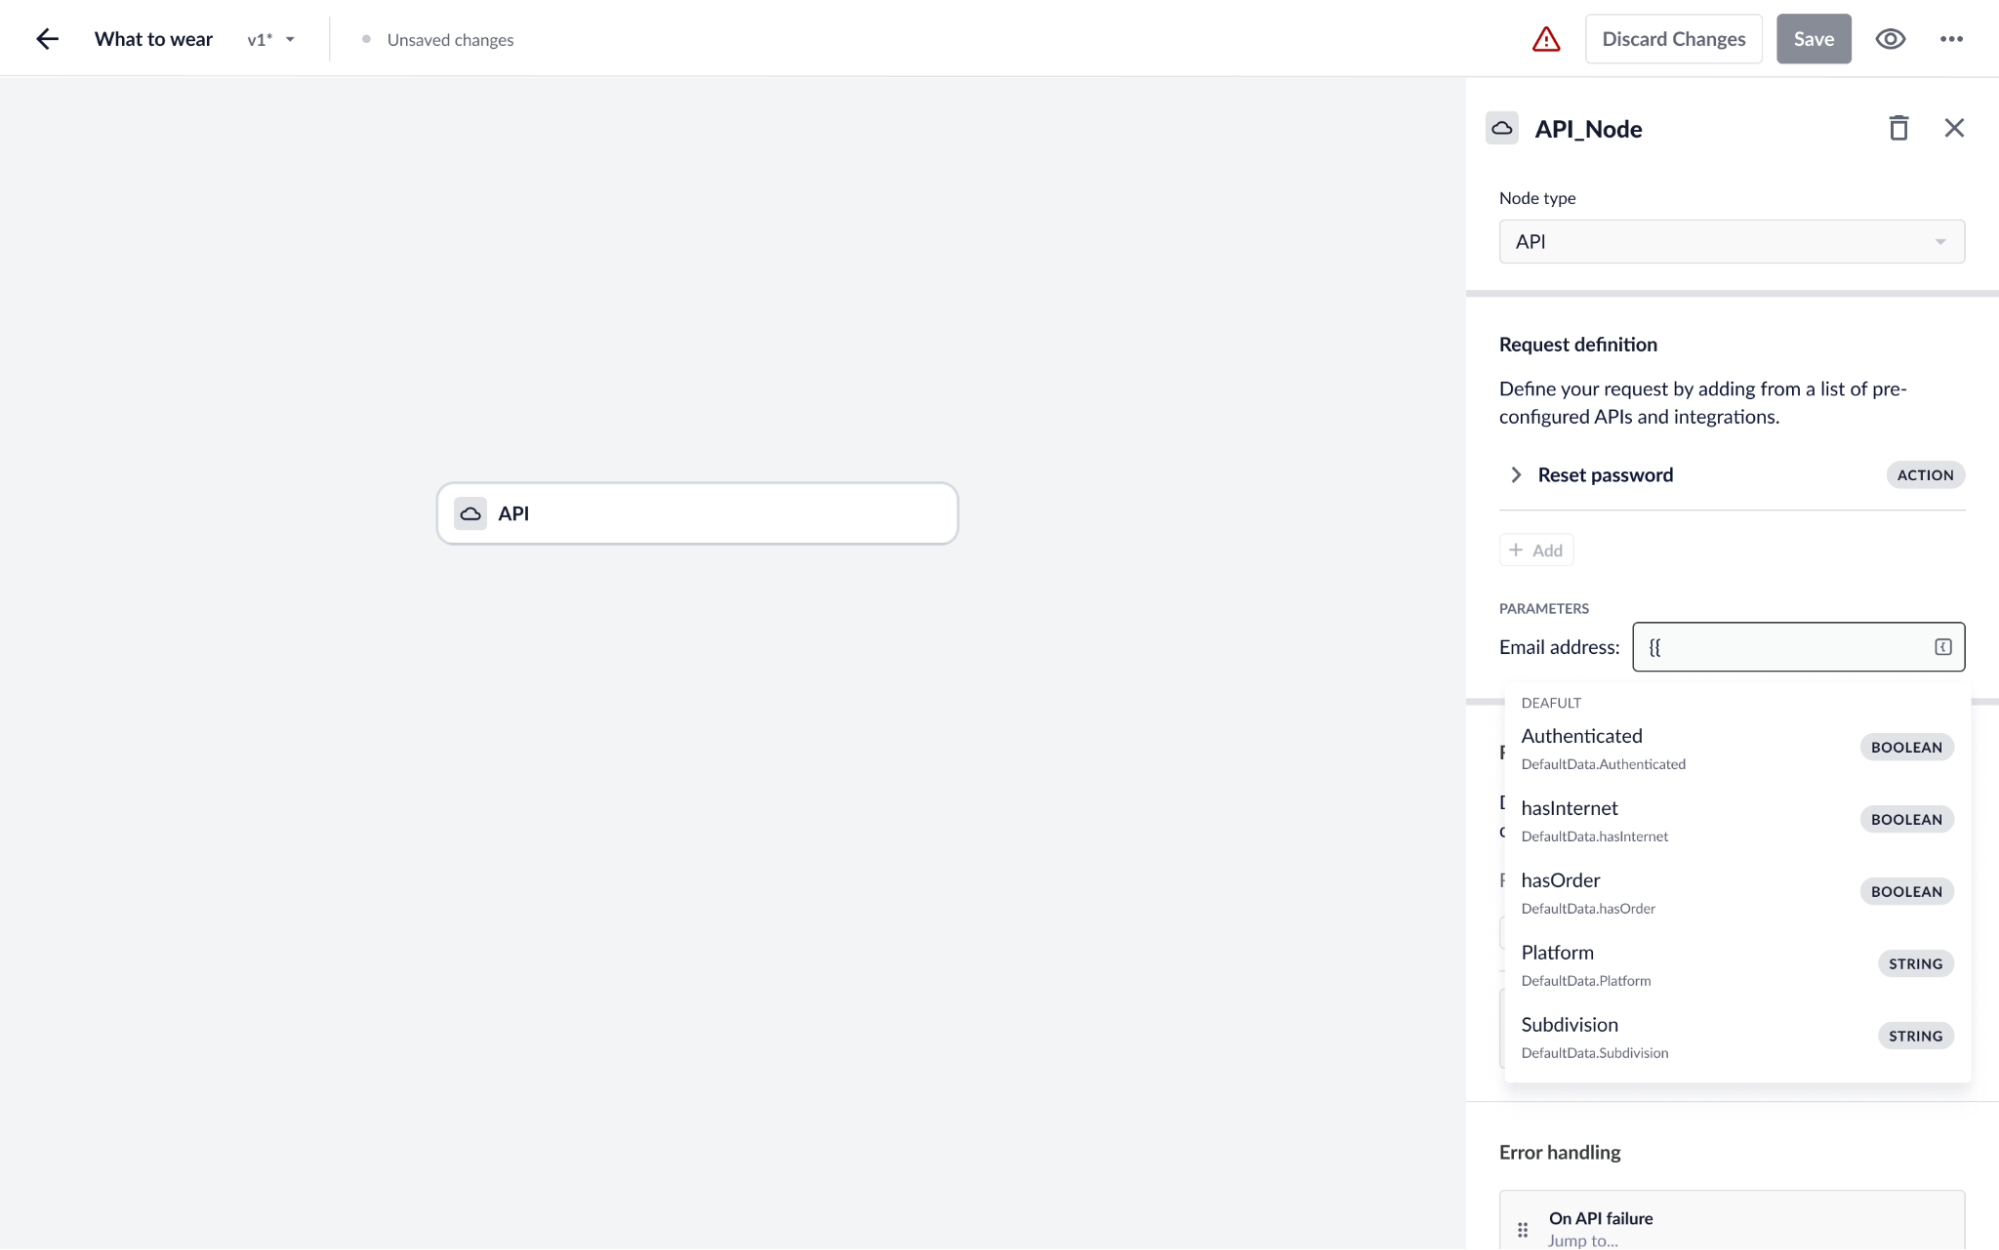
Displaying Data
You are easily able to display API fields from an API node in subsequent response nodes. This field leverages curly brackets: click the curly bracket icon or select the shift>{ or } keys in the Response Node Content section to choose API values to display, which will render as a dynamic API field in the flow graph.
Routing to Different Nodes
Routing and data operators allow you to specify different flow branching based on what is returned from an API. This leverages the same framework as routing on other nodes, but provides additional functionality around operators to give you flexibility in configuring routing conditions.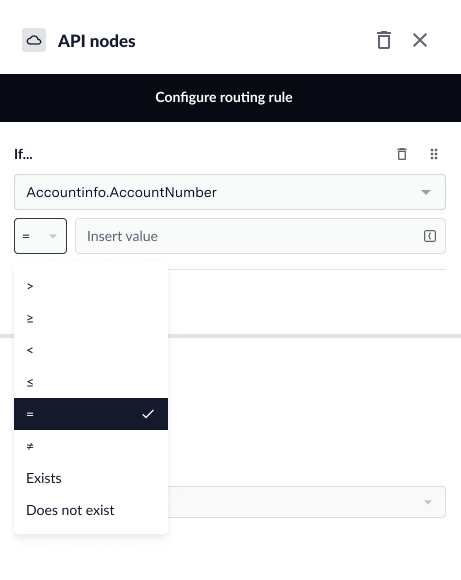
Error Handling
API nodes provide default error handling, but you are able to create custom error handling on the node itself if desired. You can specify where a user should be directed in the event of an error with the API call.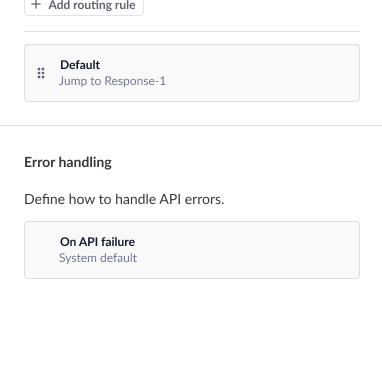
API Library
API fields are available under the integrations menu. In this page, you can view and search through all available objects and associated data fields.Redirect Node
The Redirect Node serves to link flows with one another by directing the customer to a separate flow. A Redirect Node does not display content to the customer. In this node, you can define the following:- Destination
- Routing
- Advanced Settings
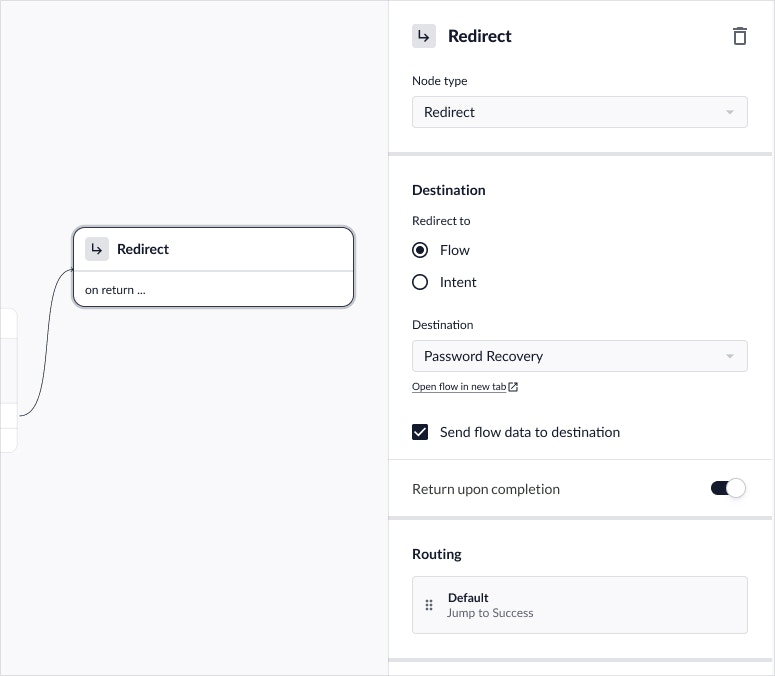
Destination
The Destination section allows you to define where to redirect the customer. You can redirect to an existing flow or an intent.- Select Flow to redirect to an individual flow destination.
- Select Intent to redirect the customer to solve for a broader issue intent that may route them to different flows depending on the intent routing rules.
Routing (Return Upon Completion)
Redirect nodes can end your flow or you can choose to have the customer return your flow after the destination flow has completed. To do so, toggle on Return upon completion. After doing so, you can define the default routing rule that will execute upon customer return.Agent Node
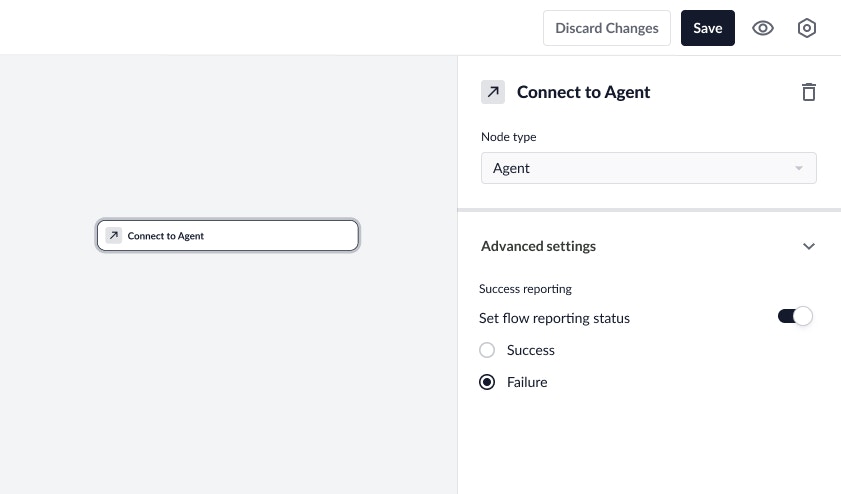
The Agent Node enables you to direct the customer to an agent queue in order to help resolve their issue. The data associated with this customer will be used to determine the live agent queue to put them in.Advanced Settings
In the Advanced Settings section, you can set flow success reporting for the agent node.Flow Success
Flow success attempts to accurately measure whether a customer has successfully self-served through the virtual agent. This is measured by setting the appropriate flow reporting status on certain nodes within a flow. Learn more: How do I determine flow success? For agent nodes, this is always considered a failure. To set flow reporting status for agent nodes:- Toggle Set flow reporting status on.
- By default, Failure will be selected for agent nodes
End Node
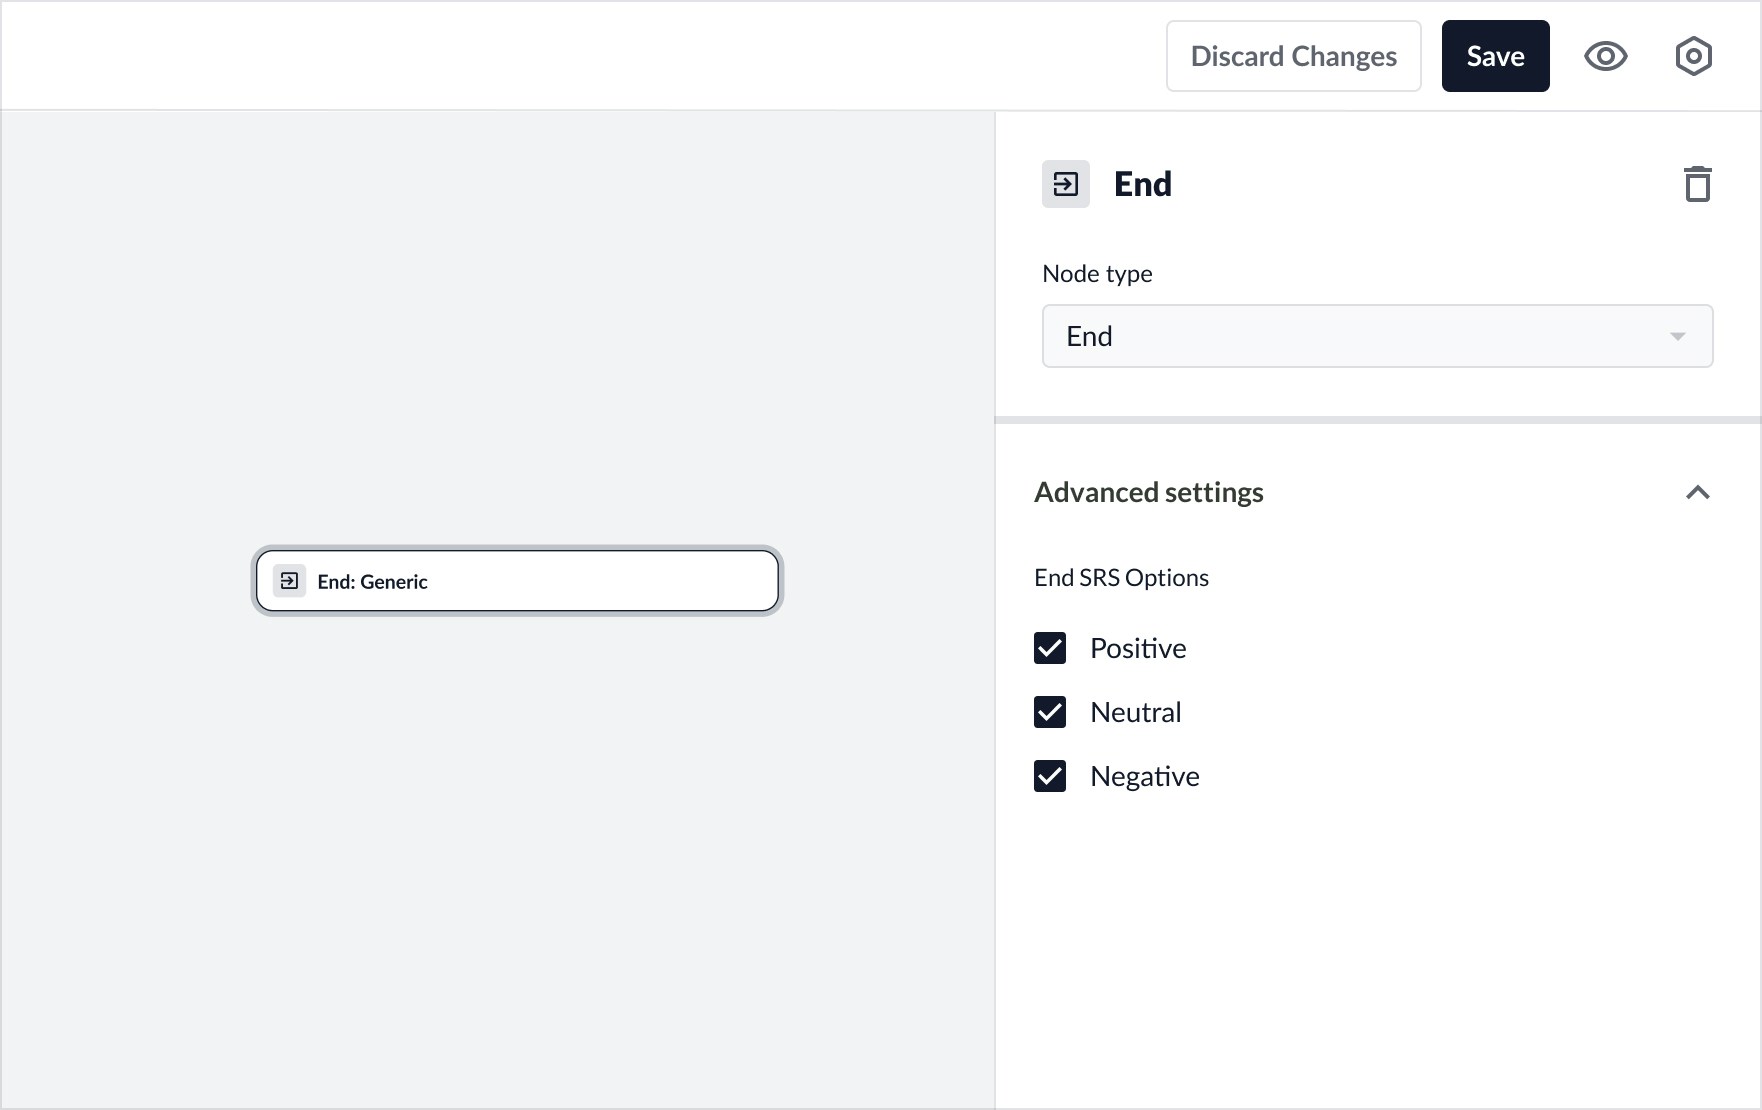
The End Node wraps up the conversation by confirming whether the customer needs additional help.Advanced Settings
In the Advanced Settings section, you can select the end Semantic Response Score (SRS) options (see below) for your flow. By default, all three options will be selected when an end node is added, thus presenting all three options for the customer to select from. You can expand the section to modify these options to present to the customer.End SRS Options
At the end of a flow, the virtual agent will ask the customer: “Is there anything else we can help you with today?”* After the above message is sent, there are three options available for the customer to select from:- “Thanks, I’m all set” A customer selecting this positive option will prompt the virtual agent to wrap up and resolve the issue.
- “I have another question” A customer selecting this neutral option will prompt the virtual agent to ask the customer what their question is.
- “My question has not been answered” A customer selecting this negative option will prompt the virtual agent to escalate the customer into agent chat to help resolve their issue. *Exact end SRS options and text may vary. Please contact your ASAPP team for more details.
Logic Nodes
The Logic Node enables you to define a “rule” or “logic” by which a flow should branch off based on different conditions. This gives you the ability to create more dynamic flows that can adapt to different customer inputs or other conversational context. For example, a Logic Node can evaluate if a user’szipcode equals New York:
- If true, the flow continues to Message Node 1 (“Area is eligible for discount”)
- Otherwise, it goes to Message Node 2 (“Area is not eligible for a discount”)
Quick Start: Flows
Create Flow
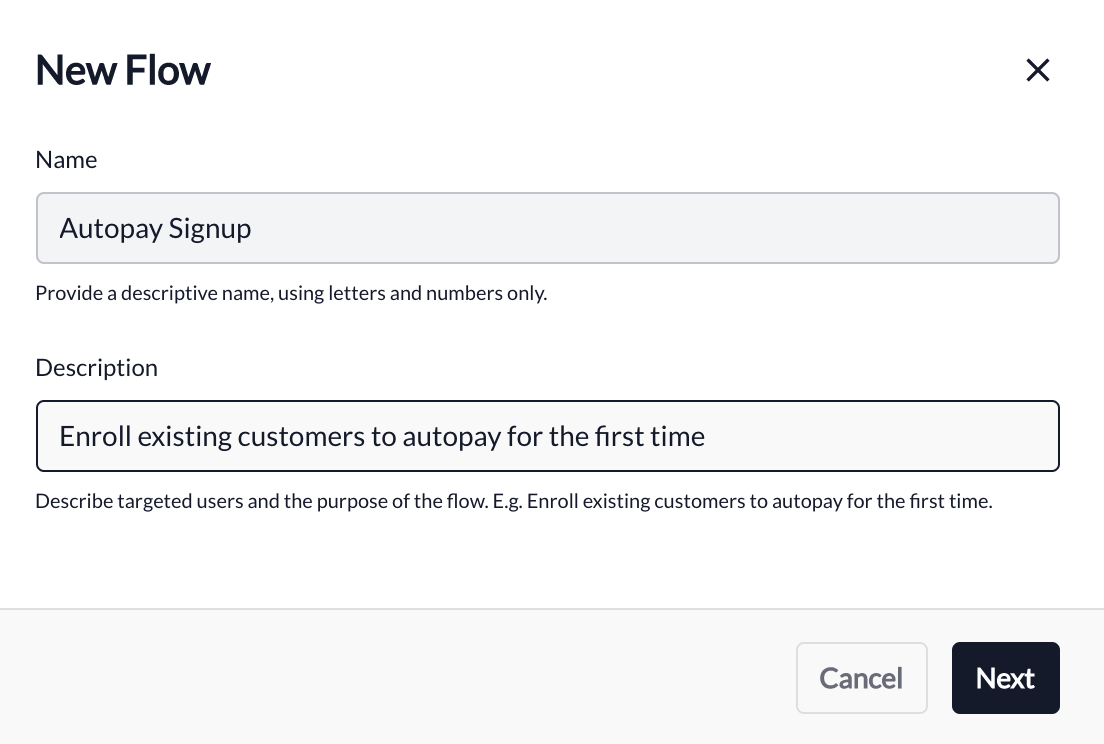
- Name: Give a unique name for your flow, using letters and numbers only.
- Description: Give a brief description of the purpose of the flow.
Avoid vague flow names. Using clear names & descriptions allow others to quickly distinguish the purpose of your flow. We recommend following an “Objective +Topic” naming convention, such as: Find Food or Pay Bill.
Preview Flow
You can preview your flow as you are building it! In the toolbar, select the eye icon to open the in-line preview. This panel will then allow you to preview the version of the flow that is currently displayed. As you are actively editing a flow, select this icon at any time to preview your progress.
Preview Capabilities
There are a few capabilities to leverage in preview:- Re-setting: puts you back to the first node of the flow and allows you to test it again.
- Debug information: opens a panel that provides more detailed insights into where you are in a flow and the associated metadata with your preview.
- Close: close the in-line preview.
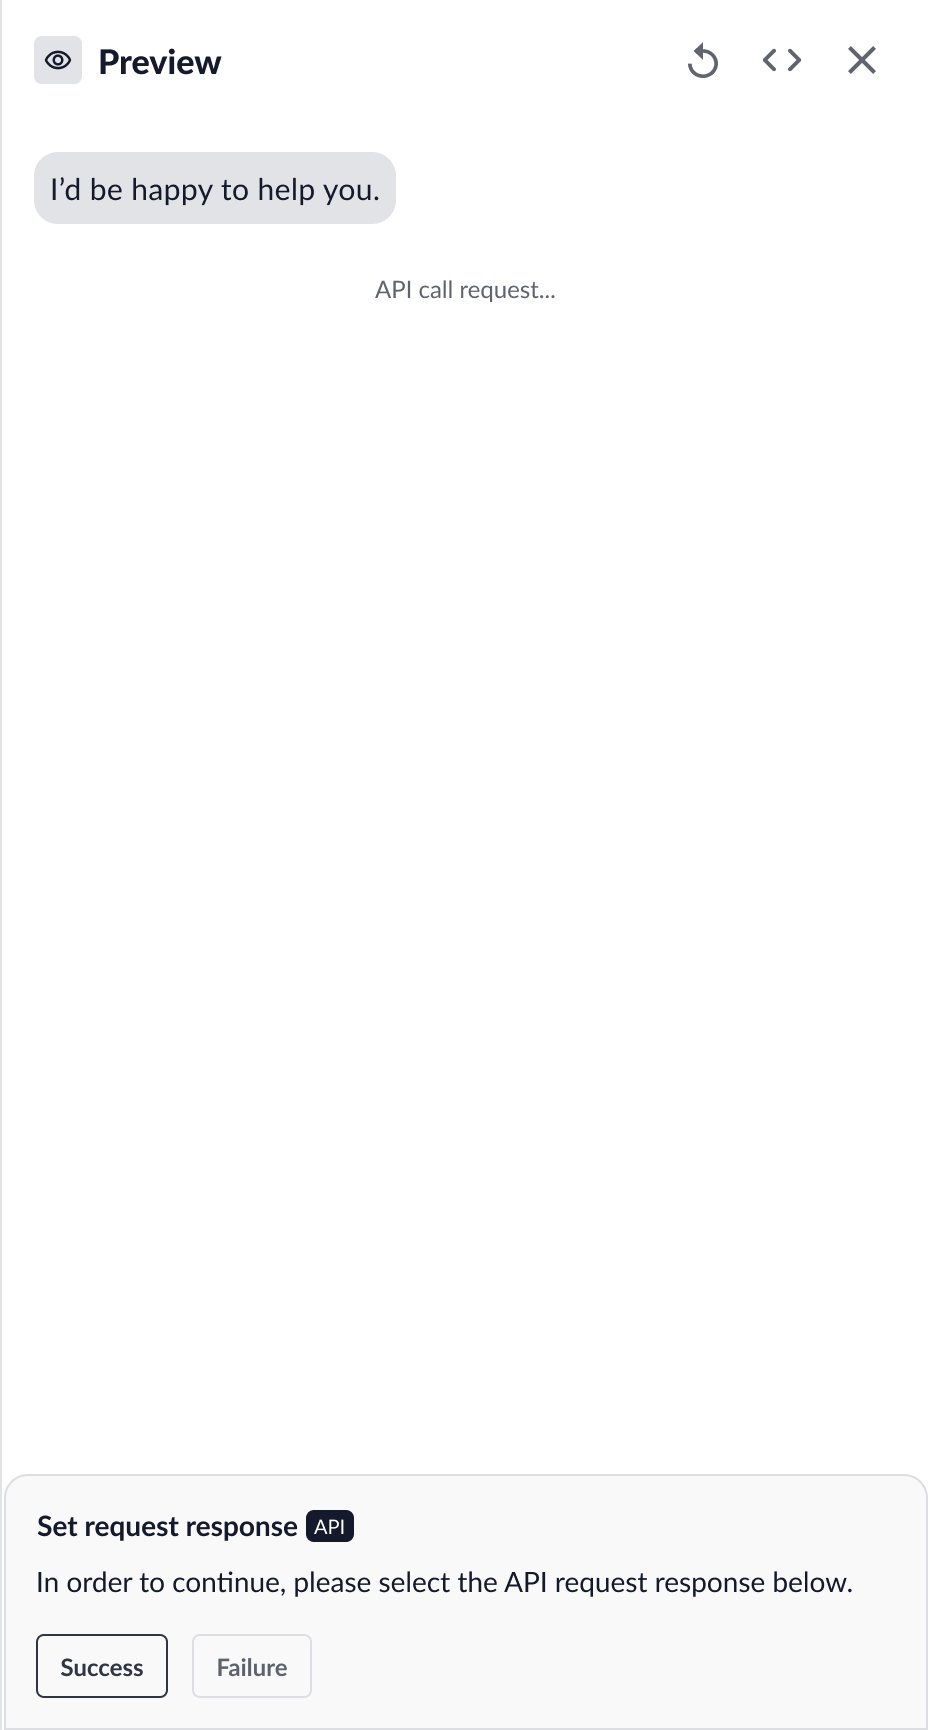
Preview with Mocked Data
The real time preview also has the ability to preview integrated flows using mocked data. By mocking data directly in the preview, you can test different flow paths based on the different values an API can return.-
Define Request
- You can define if the request is a success or failure when previewing. Each API node is treated as a separate call in the preview experience.
-
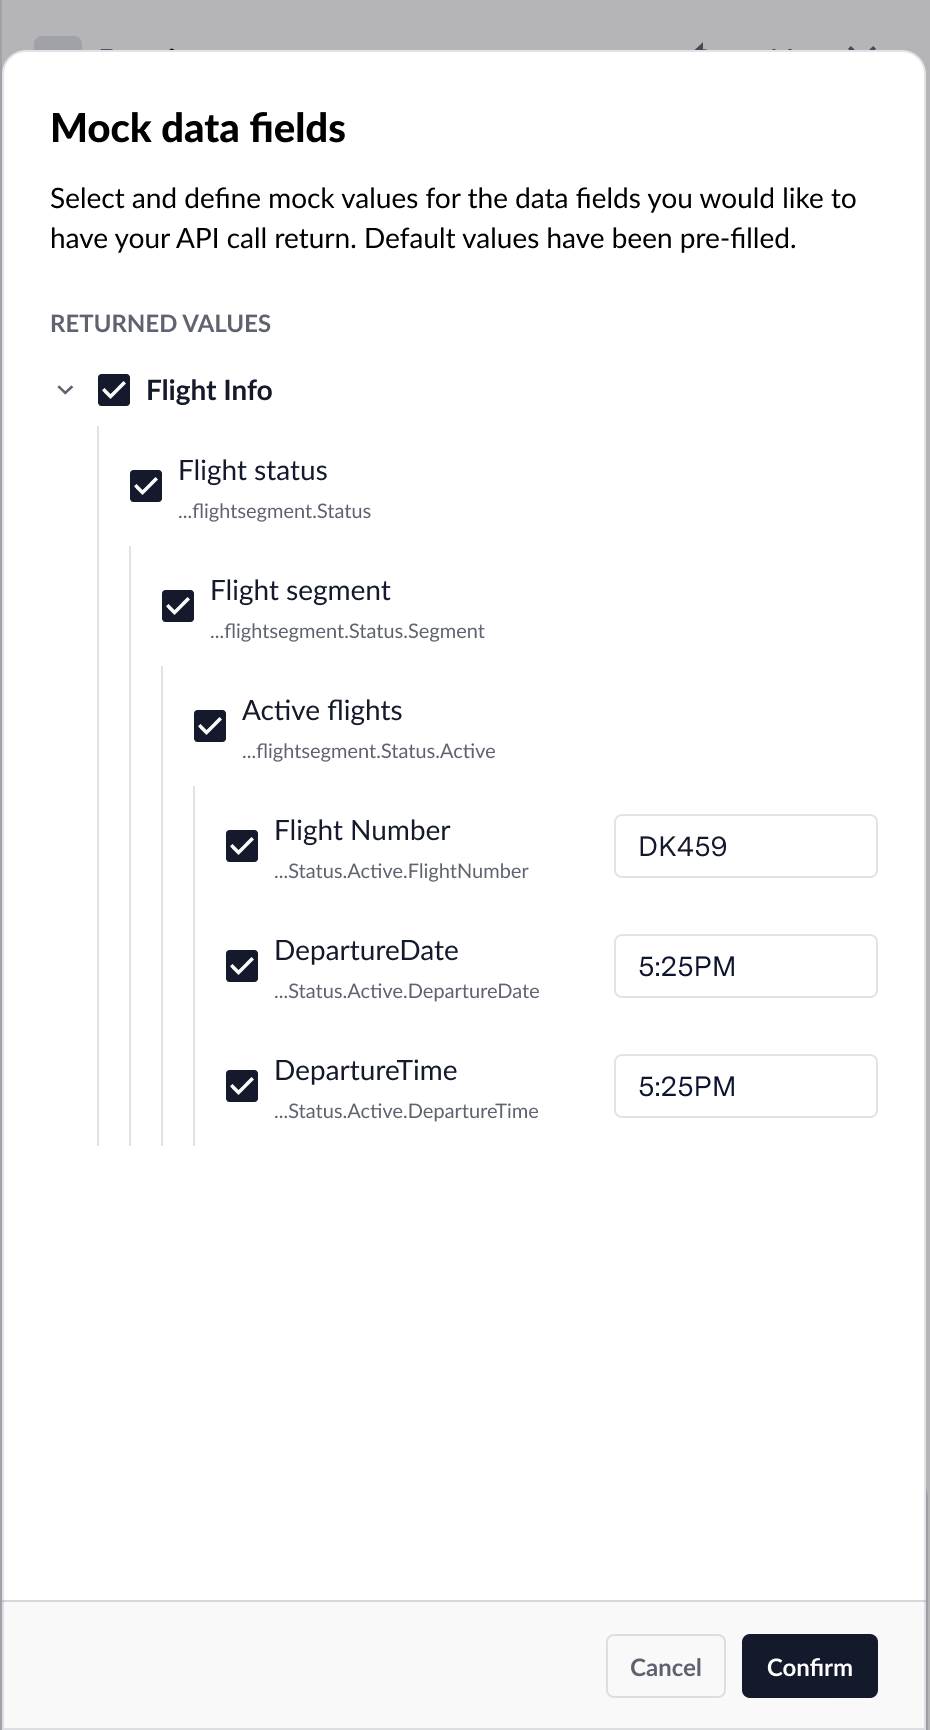
View and Edit Mock Data Fields
- For a successful API call, you can view and edit mock data fields, which will inform the subsequent flow path in the preview.
- By default, all returned values are selected and pre-filled. Values set in the preview will be cached until you leave the flow builder, to prevent the need to re-enter each mock data form.
Save New Flow
When you are building a new flow, the following buttons will display in the toolbar:- Discard changes: remove all unsaved changes made to the flow.
- Save: save changes to the flow as a new version or override an existing version.

Deploy New Flow
Newly created flows (i.e. the initial version) will immediately deploy to test environments and production. These new flows can be deployed without harm since customers will not be able to invoke the flow unless there are incoming routes due to intent routing.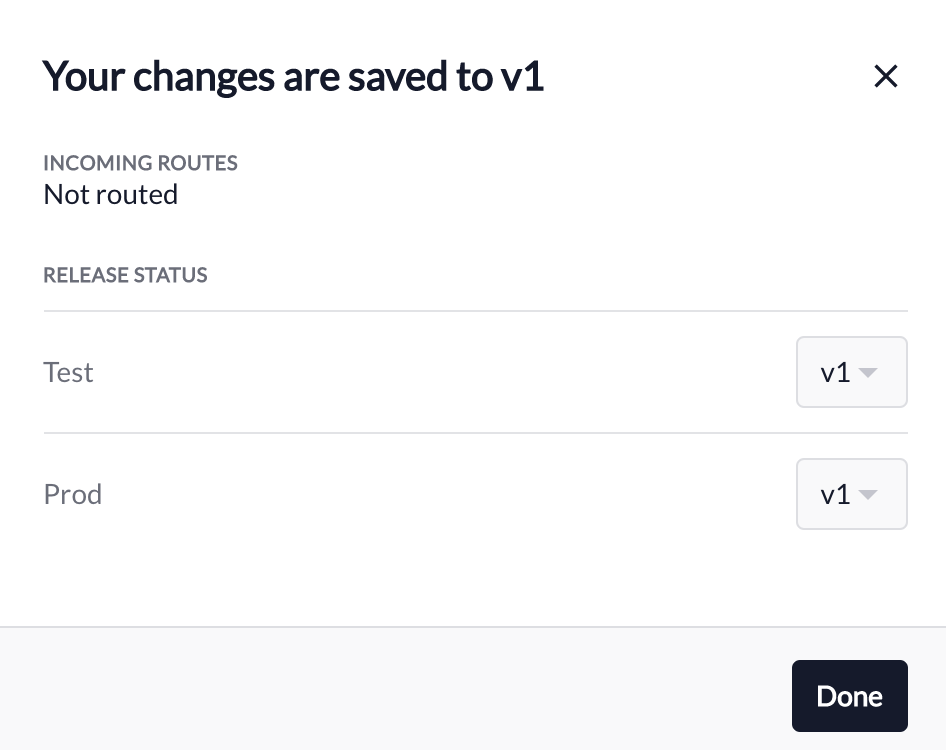
Test New Flow
After deploying your flow to test, navigate to your respective test environment in order to verify your flow changes:- In the upper right corner of the toolbar, click the icon for More actions.
- Select Copy link to demo.
- Copy the Flow Shortcut.
- Choose to Go to demo env.
- Once there, select the chat bubble and paste the flow shortcut into the text entry to start testing your flow.
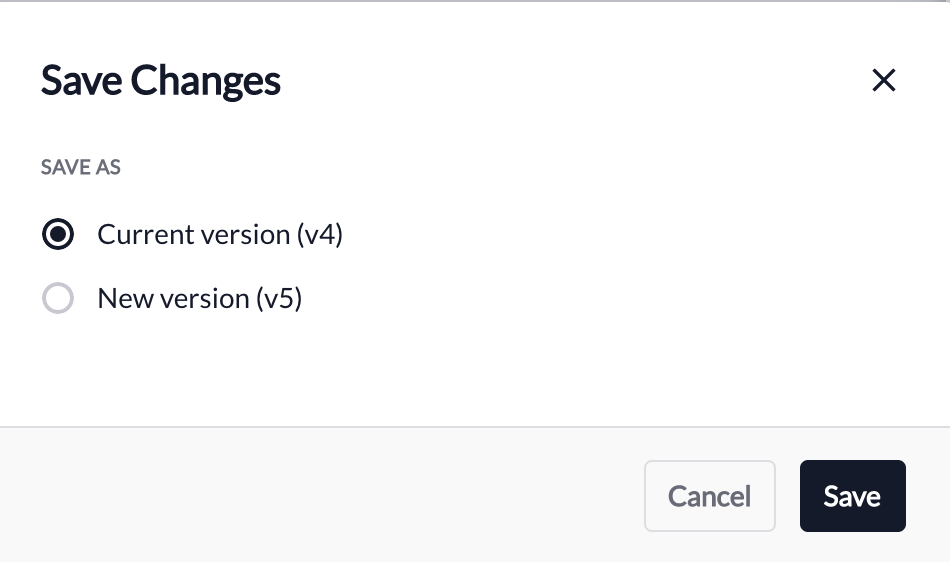
Edit & Save New Version
You can make changes to your new flow by selecting a node and making edits in the Node Configuration Panel. Once you are ready to save your changes, select Save. Since the current version of the flow is already deployed to production, you will NOT be able to save over the current version and MUST save as a new version to prevent unintentional changes to flows in production.
Deploy Version to Test
After saving, you will be directed to Manage Versions where you will manage which flow version is deployed to test environments and to production.. To deploy a flow version to test environments:- Select the new version you want to deploy in the version dropdown for Test.
- After selection, click Save.
- Flow version will deploy to all lower test environments within 5-10 minutes.
Test Version
After deploying your flow to test, navigate to your respective test environment in order to verify your flow changes:- In the upper right corner of the toolbar, click the icon for More actions.
- Select Copy link to demo.
- Copy the Flow Shortcut.
- Choose to Go to demo env.
- Once there, select the chat bubble and paste the flow shortcut into the text entry to start testing your flow.
Deploy Version to Prod
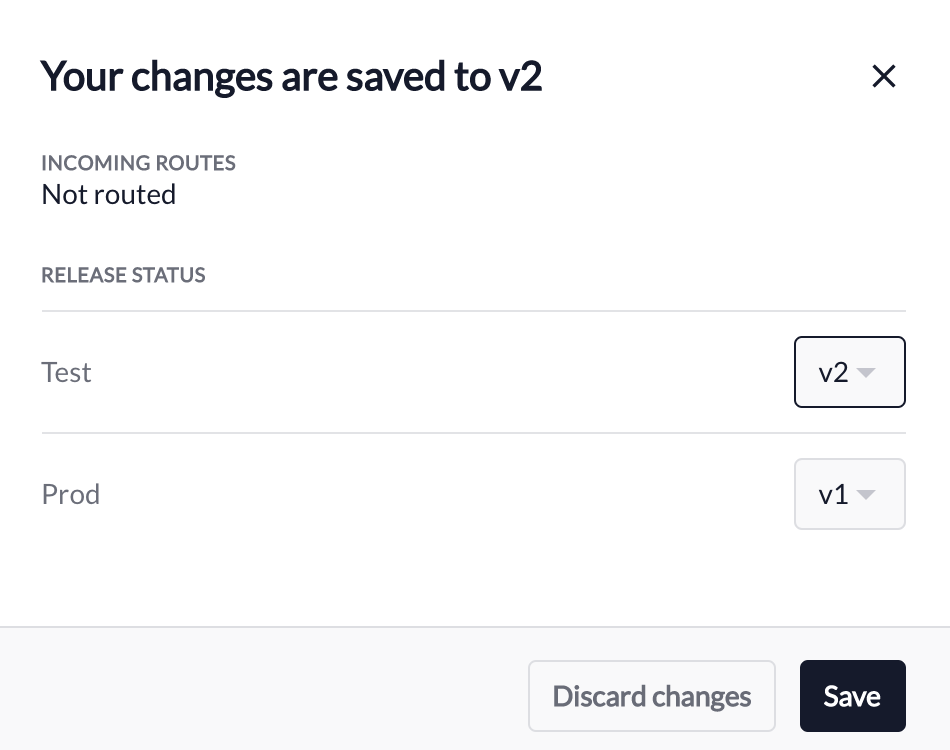
After verifying the expected flow behavior in Test, you can deploy the flow version to production, which will impact customers if there the flow is routed from an intent:- Select the version you want to deploy in the version dropdown for Prod.
- After selection, click Save.
- Flow version will deploy to Production within 5-10 minutes.

Manage Versions
When you are simply viewing a flow without making any changes, Manage Versions will always be at the top of the toolbar for you to manage flow version deployments. Upon selection, the versions that are currently deployed to Test and Prod environments will display, which you can edit as appropriate.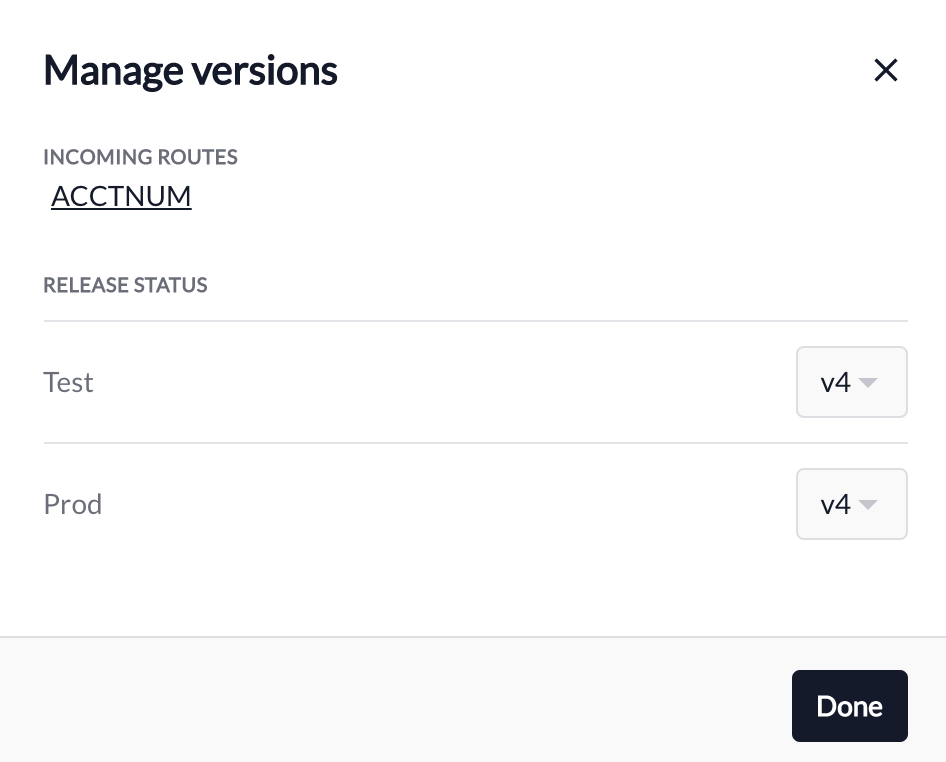
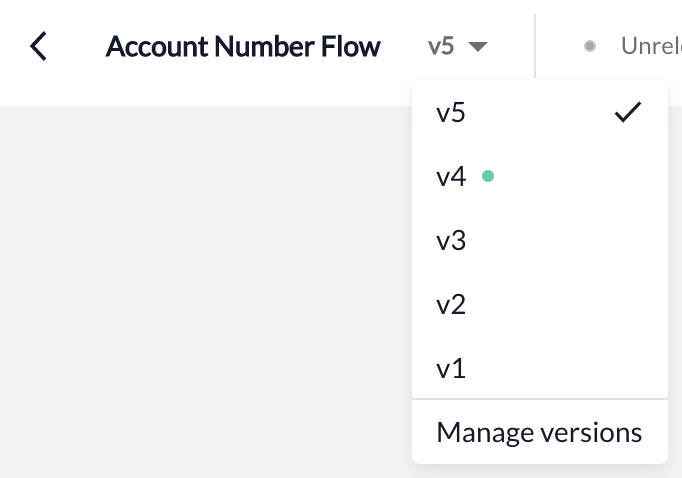
Navigate Flow Versions
Many flows may iterate through multiple versions. You can toggle to view previous flow versions using the version dropdown:- Next to the flow name, click the version dropdown in the toolbar.
- Selecting the version you want to view.
- Once selected, the version details will display in the flow graph.
- You can click any node to start editing that specific flow version.
Version Indicators
As flow versions are iteratively edited and deployed to Test and Prod, there are a few indicators in the toolbar to help the you quickly understand which version is being edited and which versions have been deployed to an environment:- Unsaved changes If the version is denoted with an asterisk along with a filled gray indicator of “Unsaved Changes”, the flow version is currently being edited and must be saved before navigating away from the page.

- Unreleased version If a version is denoted with a hollow gray indicator Unreleased version , the flow version is saved but not deployed to any environment.

- Available in test If a version is denoted with a hollow orange indicator of Available in test, the flow version is deployed to test environments (e.g. demo) but it is not routed from an intent.

- Live in test If a version is denoted with a filled orange indicator of Live in test, the flow version is deployed to test environments (e.g. demo) and it is routed from an intent.

- Available in prod If a version is denoted with a hollow green indicator of Available in prod, the flow version is deployed to the production environment but it is not routed from an intent.

- Live in prod If a version is denoted with a filled green indicator of Live in prod, the flow version is deployed to the production environment and it is routed from an intent which can be reached by customers.

- Available in test and prod If a version is denoted with a hollow green indicator of Available in test and prod, the flow version is deployed to test environments (e.g. demo) but it is not routed from an intent.

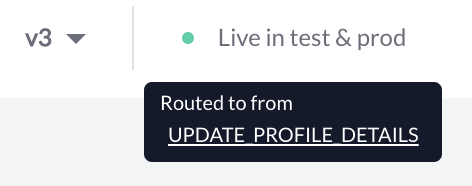
- Live in test and prod If a version is denoted with a filled green indicator of Live in test and prod, the flow version is deployed to all environments and it is routed from an intent which can be reached by customers.

View Intent Routing
If a flow is routed from an intent (e.g. Live in…), you can hover over these indicators to view and navigate to the respective intent routing page.