

How it works
At a high level, the Amazon Connect integration with GenerativeAgent works by handing off the conversation between your Amazon Connect flow and GenerativeAgent:- Hand off the conversation to GenerativeAgent through Call Transfer over PSTN.
- GenerativeAgent handles the conversation using Lambda functions to communicate with ASAPP’s APIs, and respond to the caller using a Text to Speech (TTS) service.
- Return control back to your Amazon Connect Flow when:
- The conversation is successfully completed
- The caller requests a human agent
- An error occurs
- Use Output Context of the call to determine the next course of action.
Detailed Flow
Detailed Flow
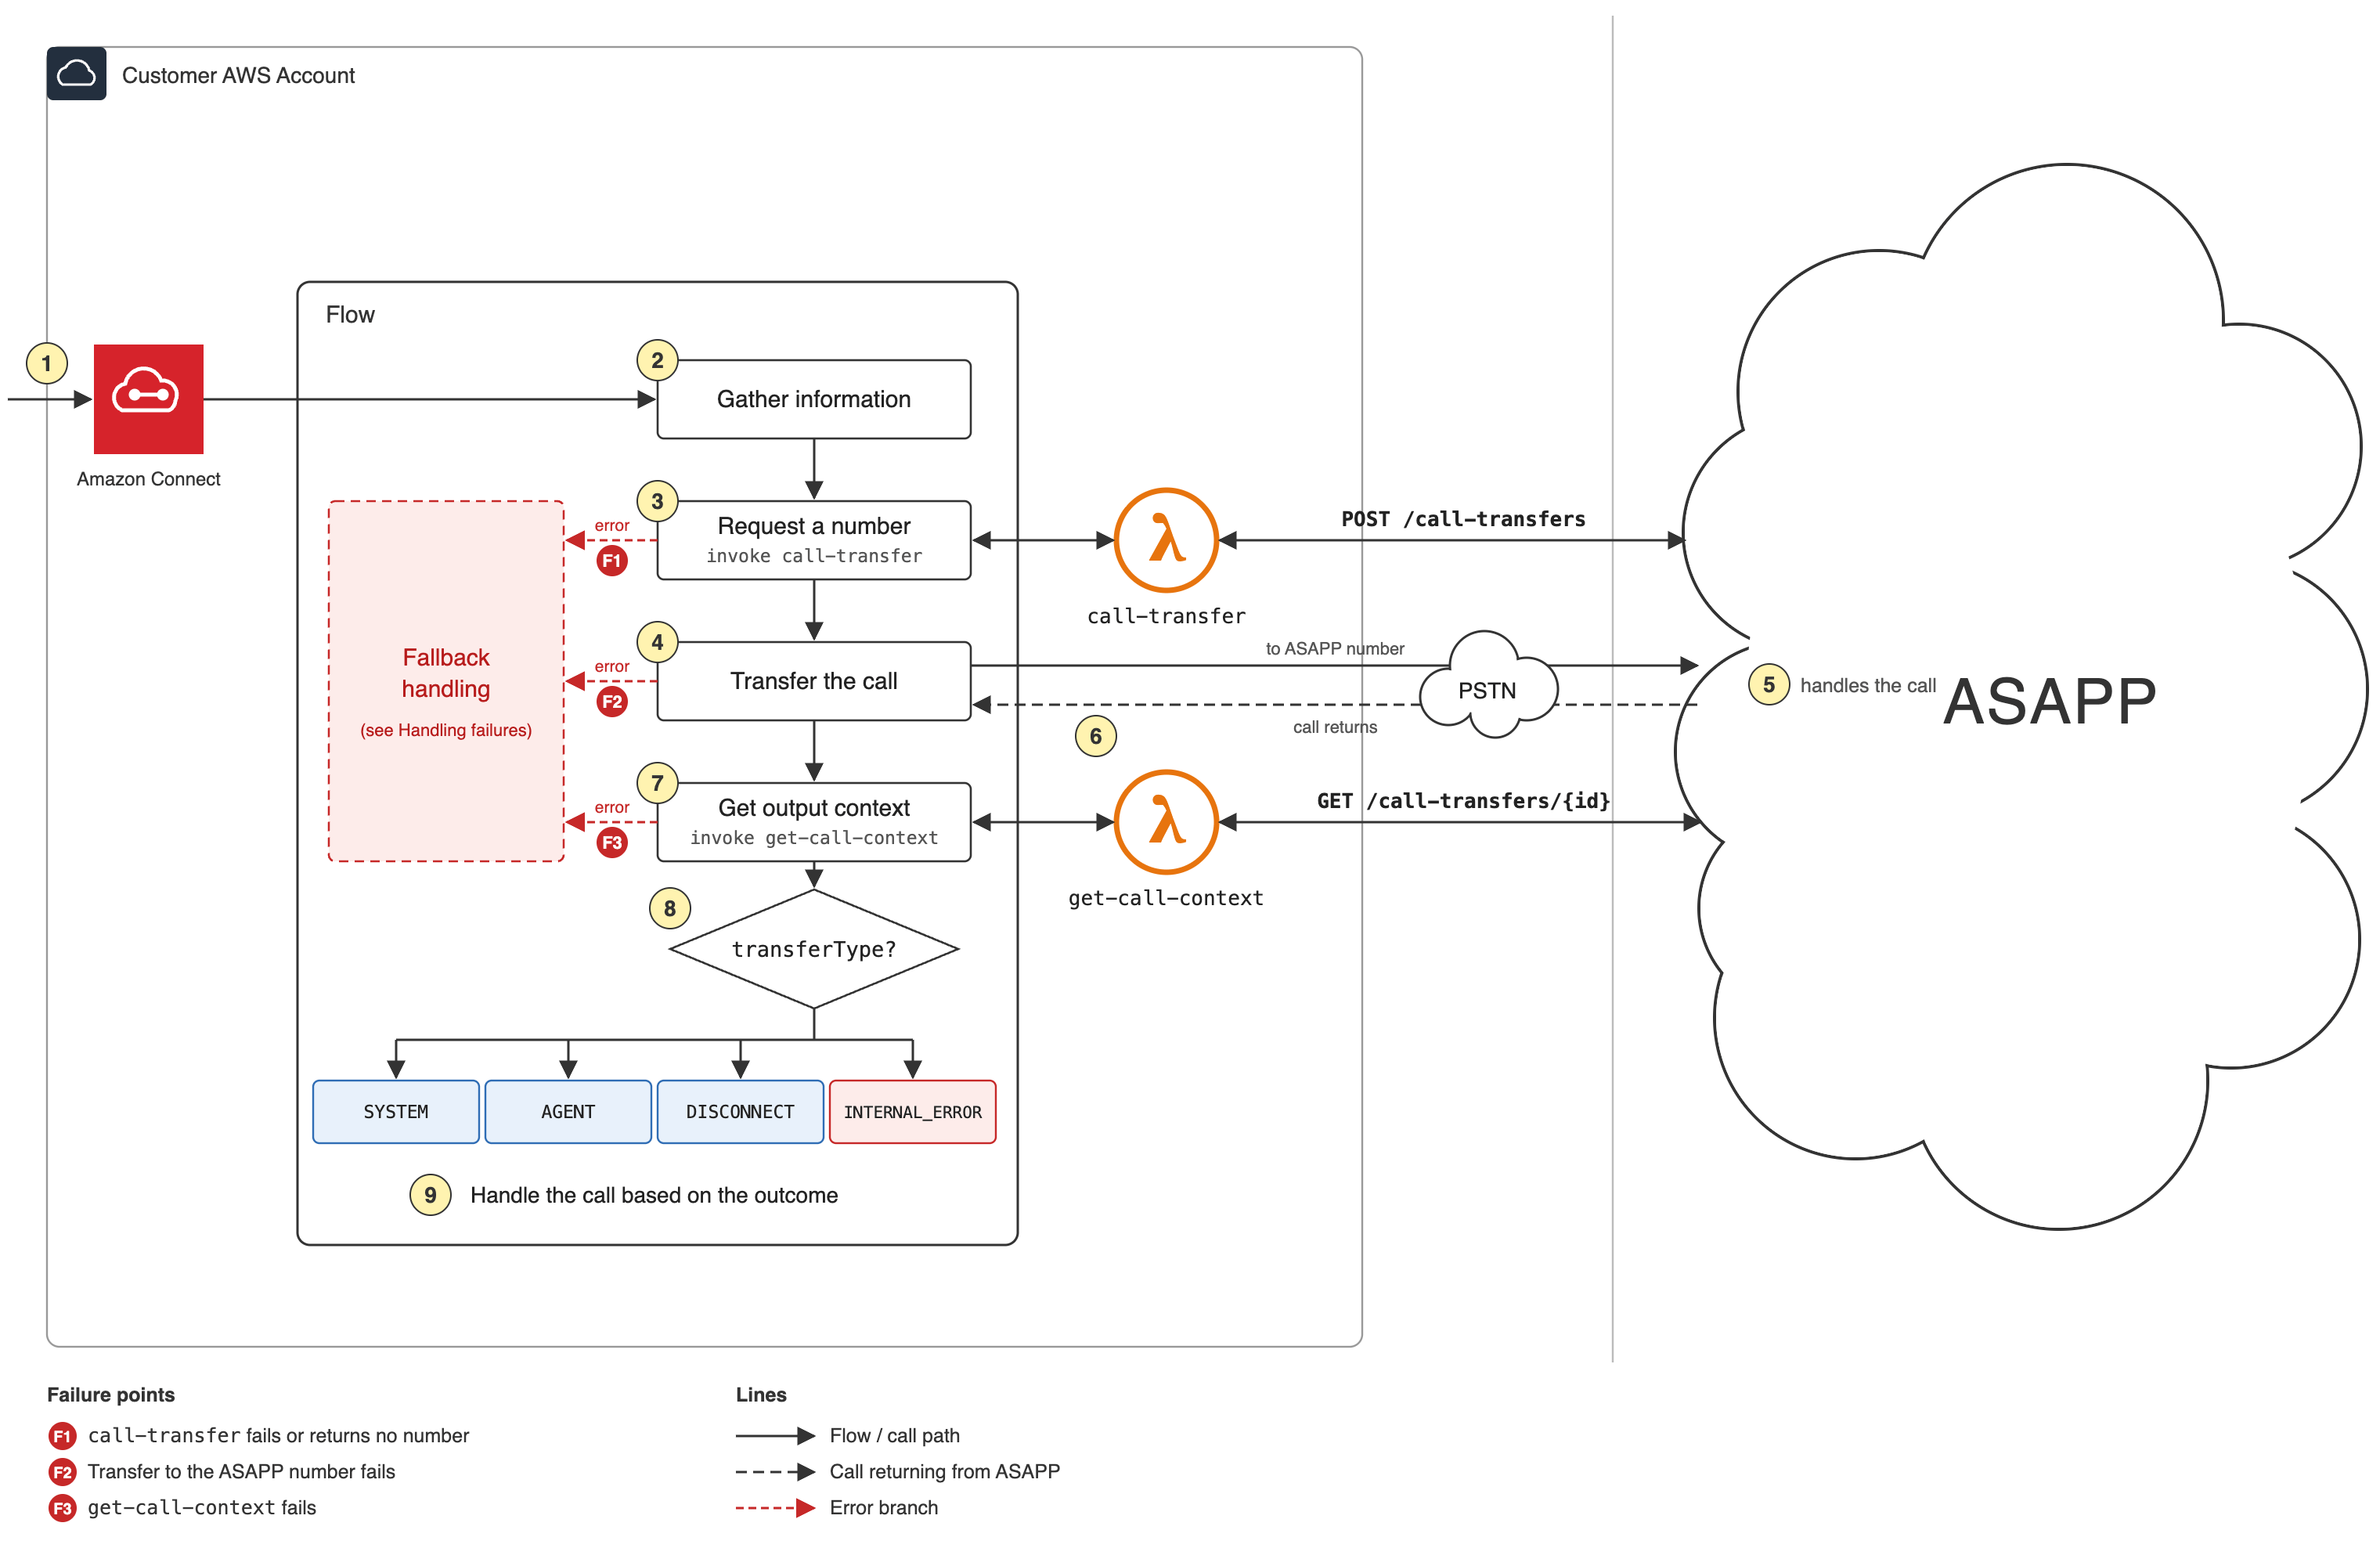
- Incoming call: A customer calls your existing phone number in Amazon Connect.
- Gather information: Your flow collects any details needed before the transfer, such as the task name or customer ID.
- Request a number: The flow invokes the
call-transferLambda function, which callsPOST /call-transfersand returns atransferNumber. - Transfer the call: The flow transfers the call over PSTN to the ASAPP number.
- GenerativeAgent handles the call: GenerativeAgent talks with the customer and works through their request.
- Call returns: The call with GenerativeAgent ends, and control returns to your flow.
- Get output context: The flow invokes the
get-call-contextLambda function, which callsGET /call-transfers/{id}and returns theoutputContext. - Check the transfer type: The flow branches on
transferType, which is one ofSYSTEM,AGENT,DISCONNECT, orINTERNAL_ERROR. - Handle the call: The flow takes the next step based on the outcome, such as routing to the IVR or a human agent queue.
Before you Begin
Before using the GenerativeAgent integration with Amazon Connect, you need to:-
Get your API Key Id and Secret
- Ensure your API key has been configured to access GenerativeAgent APIs. Reach out to your ASAPP team if you need access enabled.
-
Have an existing Amazon Connect instance:
- Have claimed phone numbers.
- Access to an Amazon Connect admin account.
-
Be familiar with AWS including Amazon Connect, IAM roles, and more:
AWS Components
You will set up and configure the following AWS services:- Amazon Connect - Handles call flow and audio streaming
- Lambda functions - These functions will handle communication between Amazon Connect and GenerativeAgent
- Enable Call Transfer over PSTN by contacting your ASAPP account team.
Configuring Amazon Connect with GenerativeAgent
Step 1: Create Lambda Functions
Lambda functions are used to interact with ASAPP’s GenerativeAgent APIs to create call transfers and retrieve call context. They can be created using the AWS Console or AWS API. To create a Lambda function in AWS Console:- Log in to the AWS Management Console.
- Open Lambda.
-
Select Author from scratch and fill in the required fields:
After filling in the required fields, click Create function.
- Basic Information
- Execution Role
- Function name:
call-transferor ‘get-call-context ’ - Runtime: Select
Node.js 22.x - Architecture: Select
x86_64
- In the Function Overview section, look for ARN and save it.
-
Go to the Code tab, click upload from and select
.zipfile to upload your Lambda function code. Click Deploy. -
Go to the Configuration tab, select Environment variables, and add the following environment variables:
- Click Save.
Sample Lambda function code to create Call Transfer
Sample Lambda function code to create Call Transfer
Response:
Sample Lambda function code to retrieve Call Context
Sample Lambda function code to retrieve Call Context
Response:
Call Transfer Data
Status
Output Context
You can have the metrics, logging, redundancy, warm starts, and other settings configured as per your specific requirements, environment, and uses cases.
Step 2: Add your Lambda Functions to your Amazon Connect instance
The Lambda function must be added to your Amazon Connect instance to be used in the contact flow. To do this:- Open the Amazon Connect console.
- Select your Amazon Connect instance.
- In the left navigation pane, choose Contact flows.
- Choose AWS Lambda functions from the dropdown menu.
- Click Add Lambda function.
- Select the Lambda function
call-transferyou created earlier. - Click Add.
- Repeat the process for the
get-call-contextLambda function.
Step 3: Set Up Flow in Amazon Connect
1
Create Call Transfer Record
To createa a Call Transfer record in your Amazon Connect contact flow, you need to reference the
call-transfer Lambda function:- In the Amazon Connect console, open your contact flow.
- Add an Invoke AWS Lambda function block at the point where you want to initiate the transfer.
- Select the
call-transferLambda function. - Map any required parameters (such as
taskNameorcustomerId) in the block’s configuration. - Use the output variable
transferNumberfrom the Lambda function as the destination number in a Transfer to phone number block. - Connect the block’s Error branch to your fallback path. This is failure point F1, see Handling failures.
- Connect the blocks to complete the flow.
2
Transfer Call to GenerativeAgent
- Go to “Transfer to phone number” block and navigate to the Properties panel.
- Set the Transfer Via to “Phone number”.
- Under Phone number, select Set Dynamically.
- The Namespace must be set to
External. - The Key must be set to
transferNumber. - Set Resume Flow after Disconnect to Yes.
- Connect the block’s Error branch to your fallback path. This is failure point F2.
- Connect the output of this block to the next step in your flow.
Resume Flow after Disconnect resumes your flow whichever side ends the call, whether GenerativeAgent handed the call back cleanly or the caller hung up. Your flow cannot tell these apart until the
get-call-context step runs, so do not treat flow resumption on its own as a successful handoff.3
Retrieve Call Context After Transfer Back
- Add another Invoke AWS Lambda function block after the transfer block.
- Select the
get-call-contextLambda function. - Map the
ContactIdfrom the Amazon Connect flow to the Lambda function input. - Use the output variable
outputContextfrom the Lambda function to determine the next steps. - Connect the block’s Error branch to your fallback path. This is failure point F3.
- Connect the output of this block to the next step in your flow.
4
Handle Call Context
-
Use the output context from the
get-call-contextLambda function to determine the next steps in your flow. -
Based on the following fields in the output context, you can decide how to proceed:
- Transfer Type: Indicates how the call ended and what you should do next. Branch your contact flow on all four possible values, not only
AGENTandSYSTEM. - Current Task Name: If it matches a specific task, you can route the call accordingly.
- Reference Variables: Use these variables to provide additional context or information to the customer.
- Transfer Variables: Use these variables to handle any specific transfer logic.
- Transfer Type: Indicates how the call ended and what you should do next. Branch your contact flow on all four possible values, not only
Handling failures
A call can fail at three distinct points in the flow. Handle them separately, because they surface in different places and call for different fallbacks. A single generic error path leaves it ambiguous which Lambda’s failure is being handled.1
The call-transfer Lambda invocation fails
An AWS-side error, a timeout, or a missing
transferNumber in the response. The Lambda returns result of "error" with an empty transferNumber.Catch this on the Invoke AWS Lambda function block’s own error branch, before your flow ever attempts the phone transfer. There is no conversation to retrieve context for, so route straight to your fallback path.2
The get-call-context Lambda invocation fails
An AWS-side error, a timeout, or a missing
outputContext in the response. The Lambda returns result of "error" with an empty outputContext.Catch this on that block’s own error branch. The conversation itself may have gone fine, but your flow has no way to read the outcome, so do not assume success. Route to your fallback path rather than letting an empty outputContext fall through your transferType branching.3
The PSTN call transfer completes with a non-success outcome
A
status of EXPIRED, or a transferType of DISCONNECT or INTERNAL_ERROR.This is only visible after get-call-context runs, so it needs its own branching as described in the Handle Call Context step.Treat EXPIRED as a failure that requires invoking the call-transfer Lambda again for a fresh number. Retrying the same transferNumber will not work, because the expired number has already been released.Handling customer reconnections
There may be scenarios where you want to reconnect a customer to where they left off with GenerativeAgent, for example after the caller hangs up or after a transfer back to your flow. To resume the conversation instead of starting a new one, invoke thecall-transfer Lambda again using the same externalConversationId. GenerativeAgent resumes the conversation where it left off.
In the sample Lambda code, externalConversationId is set to the Amazon Connect ContactId. A ContactId is specific to a single contact, so reconnecting a customer across contacts requires passing a stable identifier of your own instead. Use any identifier that stays consistent for the customer across the reconnection.
Next Steps
Now that you have integrated GenerativeAgent with Amazon Connect, here are some important next steps to consider:Configuration Overview
Learn how to configure GenerativeAgent’s behaviors, tasks, and communication style
Connect your APIs
Configure your APIs to allow GenerativeAgent to access necessary data and perform actions
Review Knowledge Base
Connect and optimize your knowledge base to improve GenerativeAgent’s responses
Go Live
Follow the deployment checklist to launch GenerativeAgent in your production environment